Zesty Delight: Mastering the Ultimate Cod Piccata Recipe at Home

Welcome to our culinary corner, where today we're featuring an exquisite twist on a classic Italian seafood dish that's sure to delight your taste buds – Cod Piccata! This light, yet flavor-packed entrée marries the delicate flakiness of perfectly cooked cod with the bright, tangy notes of lemon and capers. Cod Piccata is not only a stunning dish to serve but also a wonderfully simple recipe to elevate your weeknight dinners or impress guests at your next gathering. With a few expert tips and the right ingredients, you'll be ready to transform this seafood staple into a gourmet masterpiece. So tie on your apron, and let's dive into creating a dish that balances the succulence of the sea with the zest of Italian cuisine.

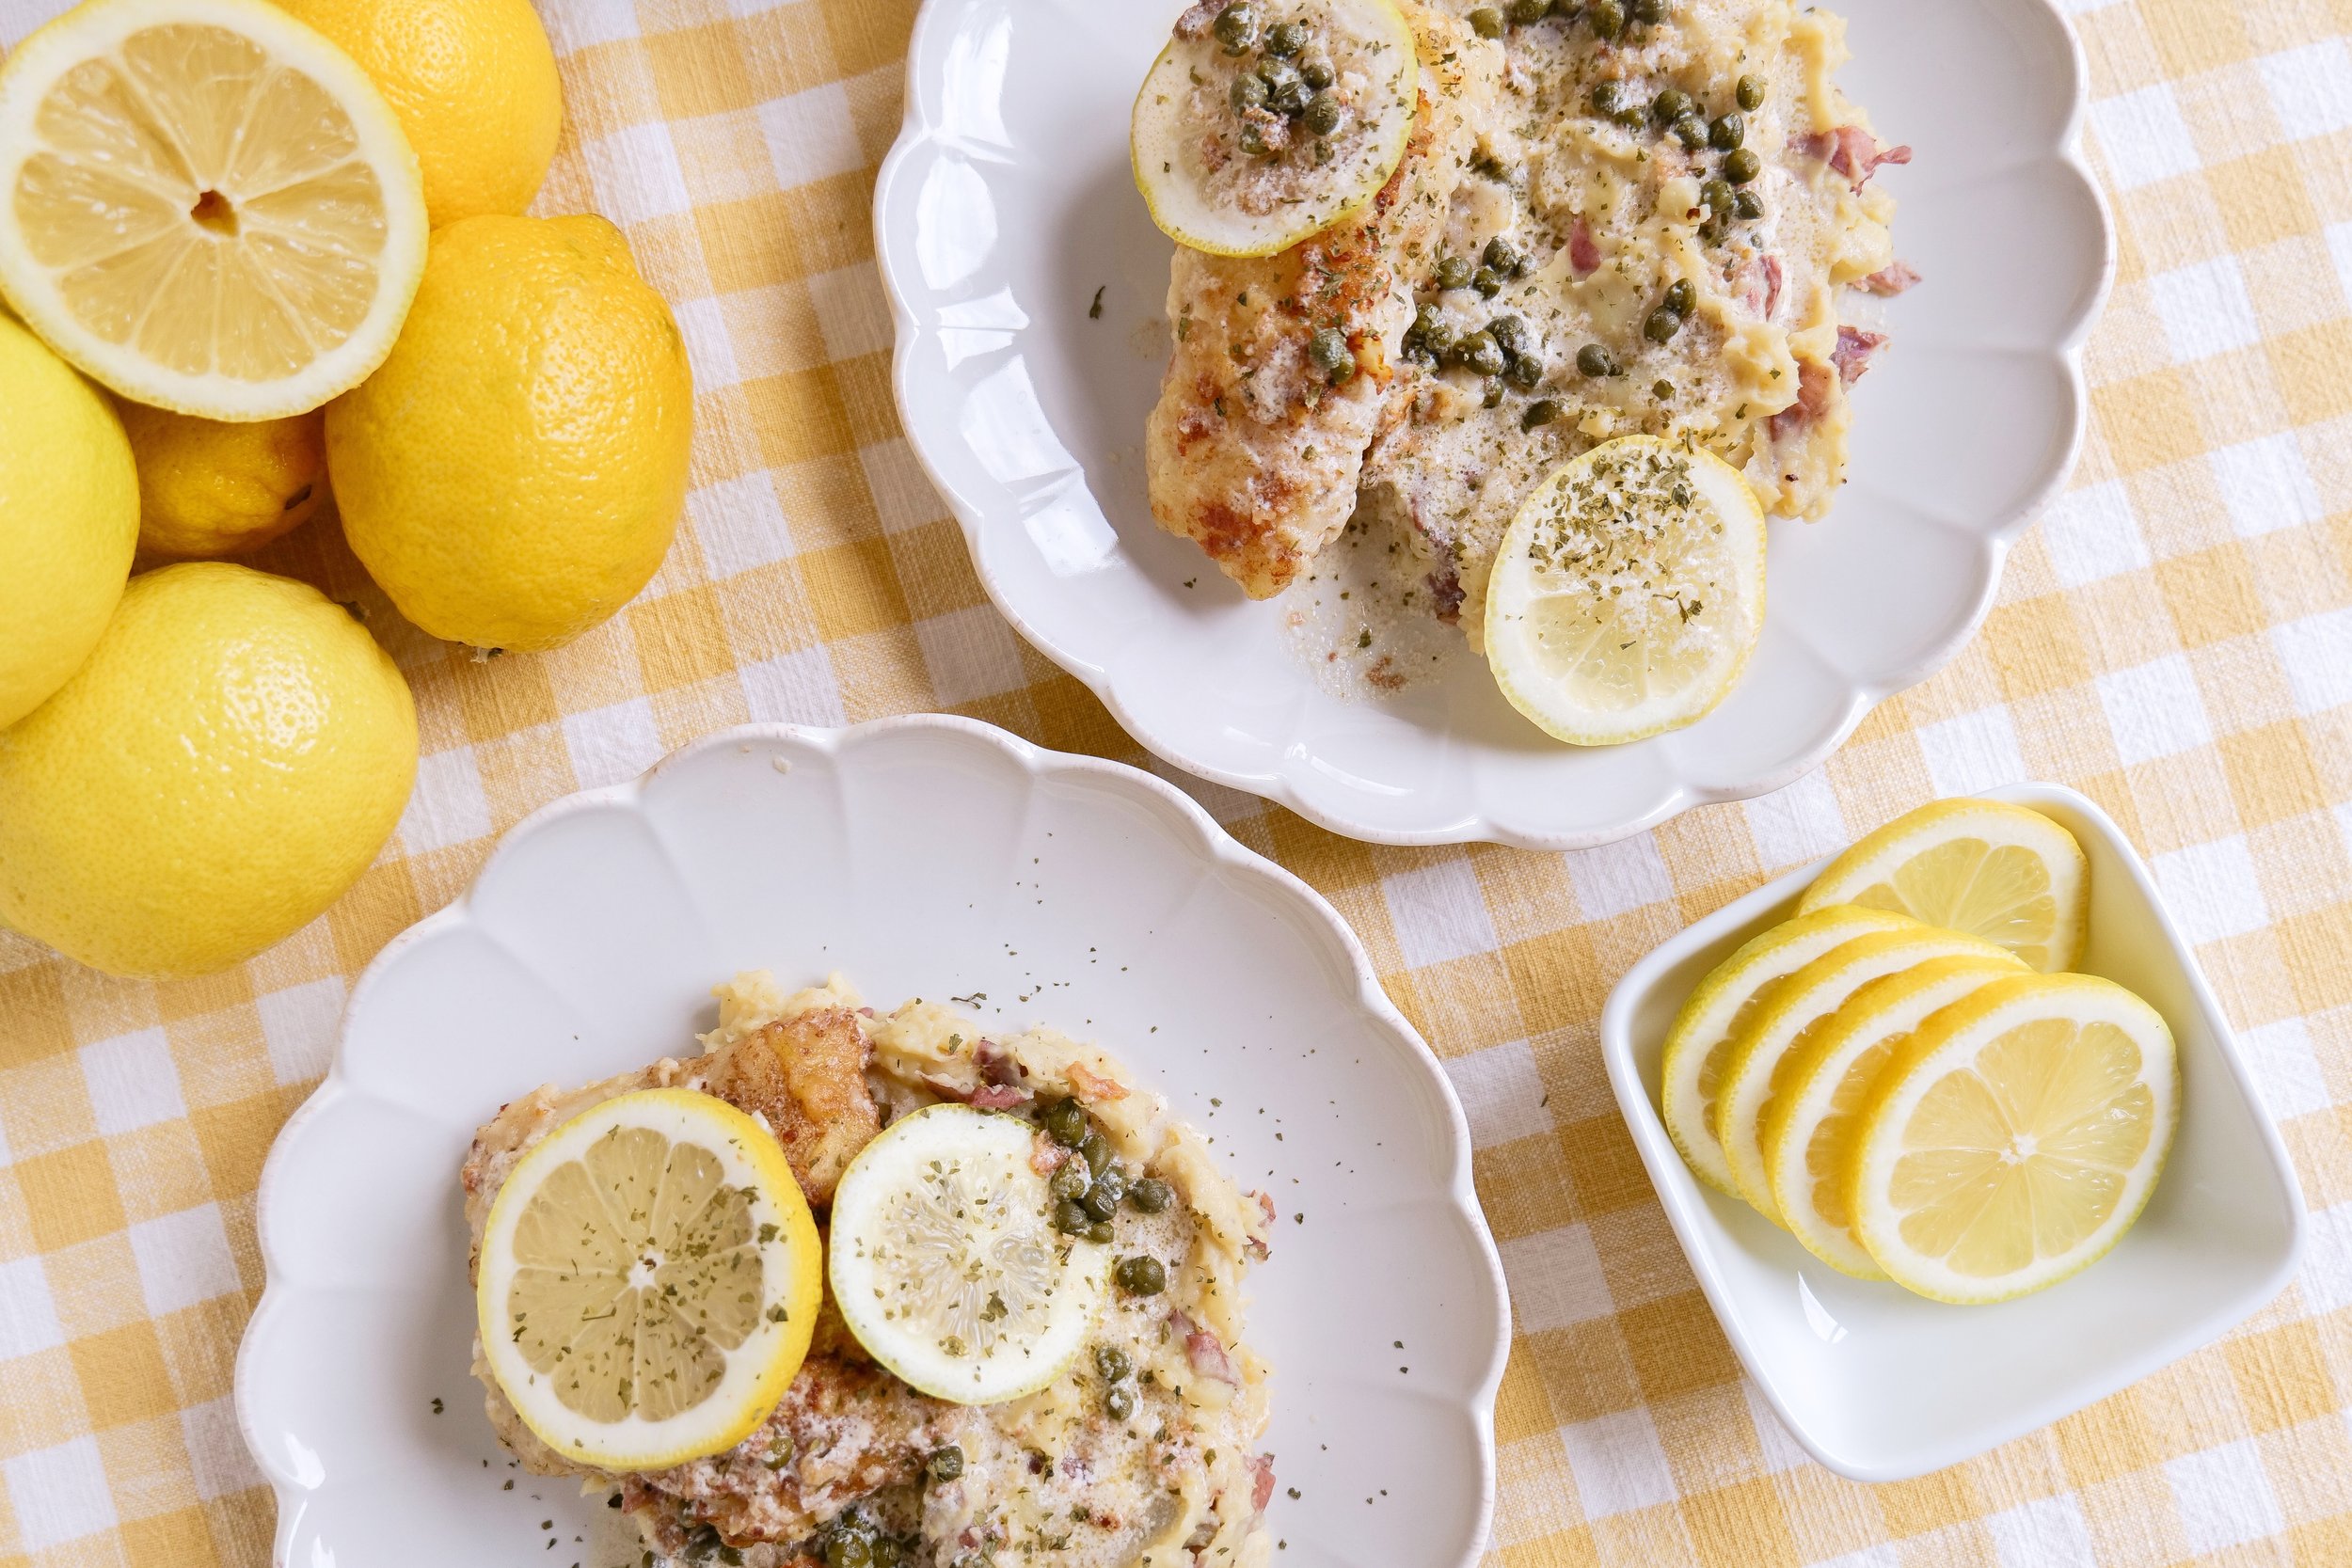
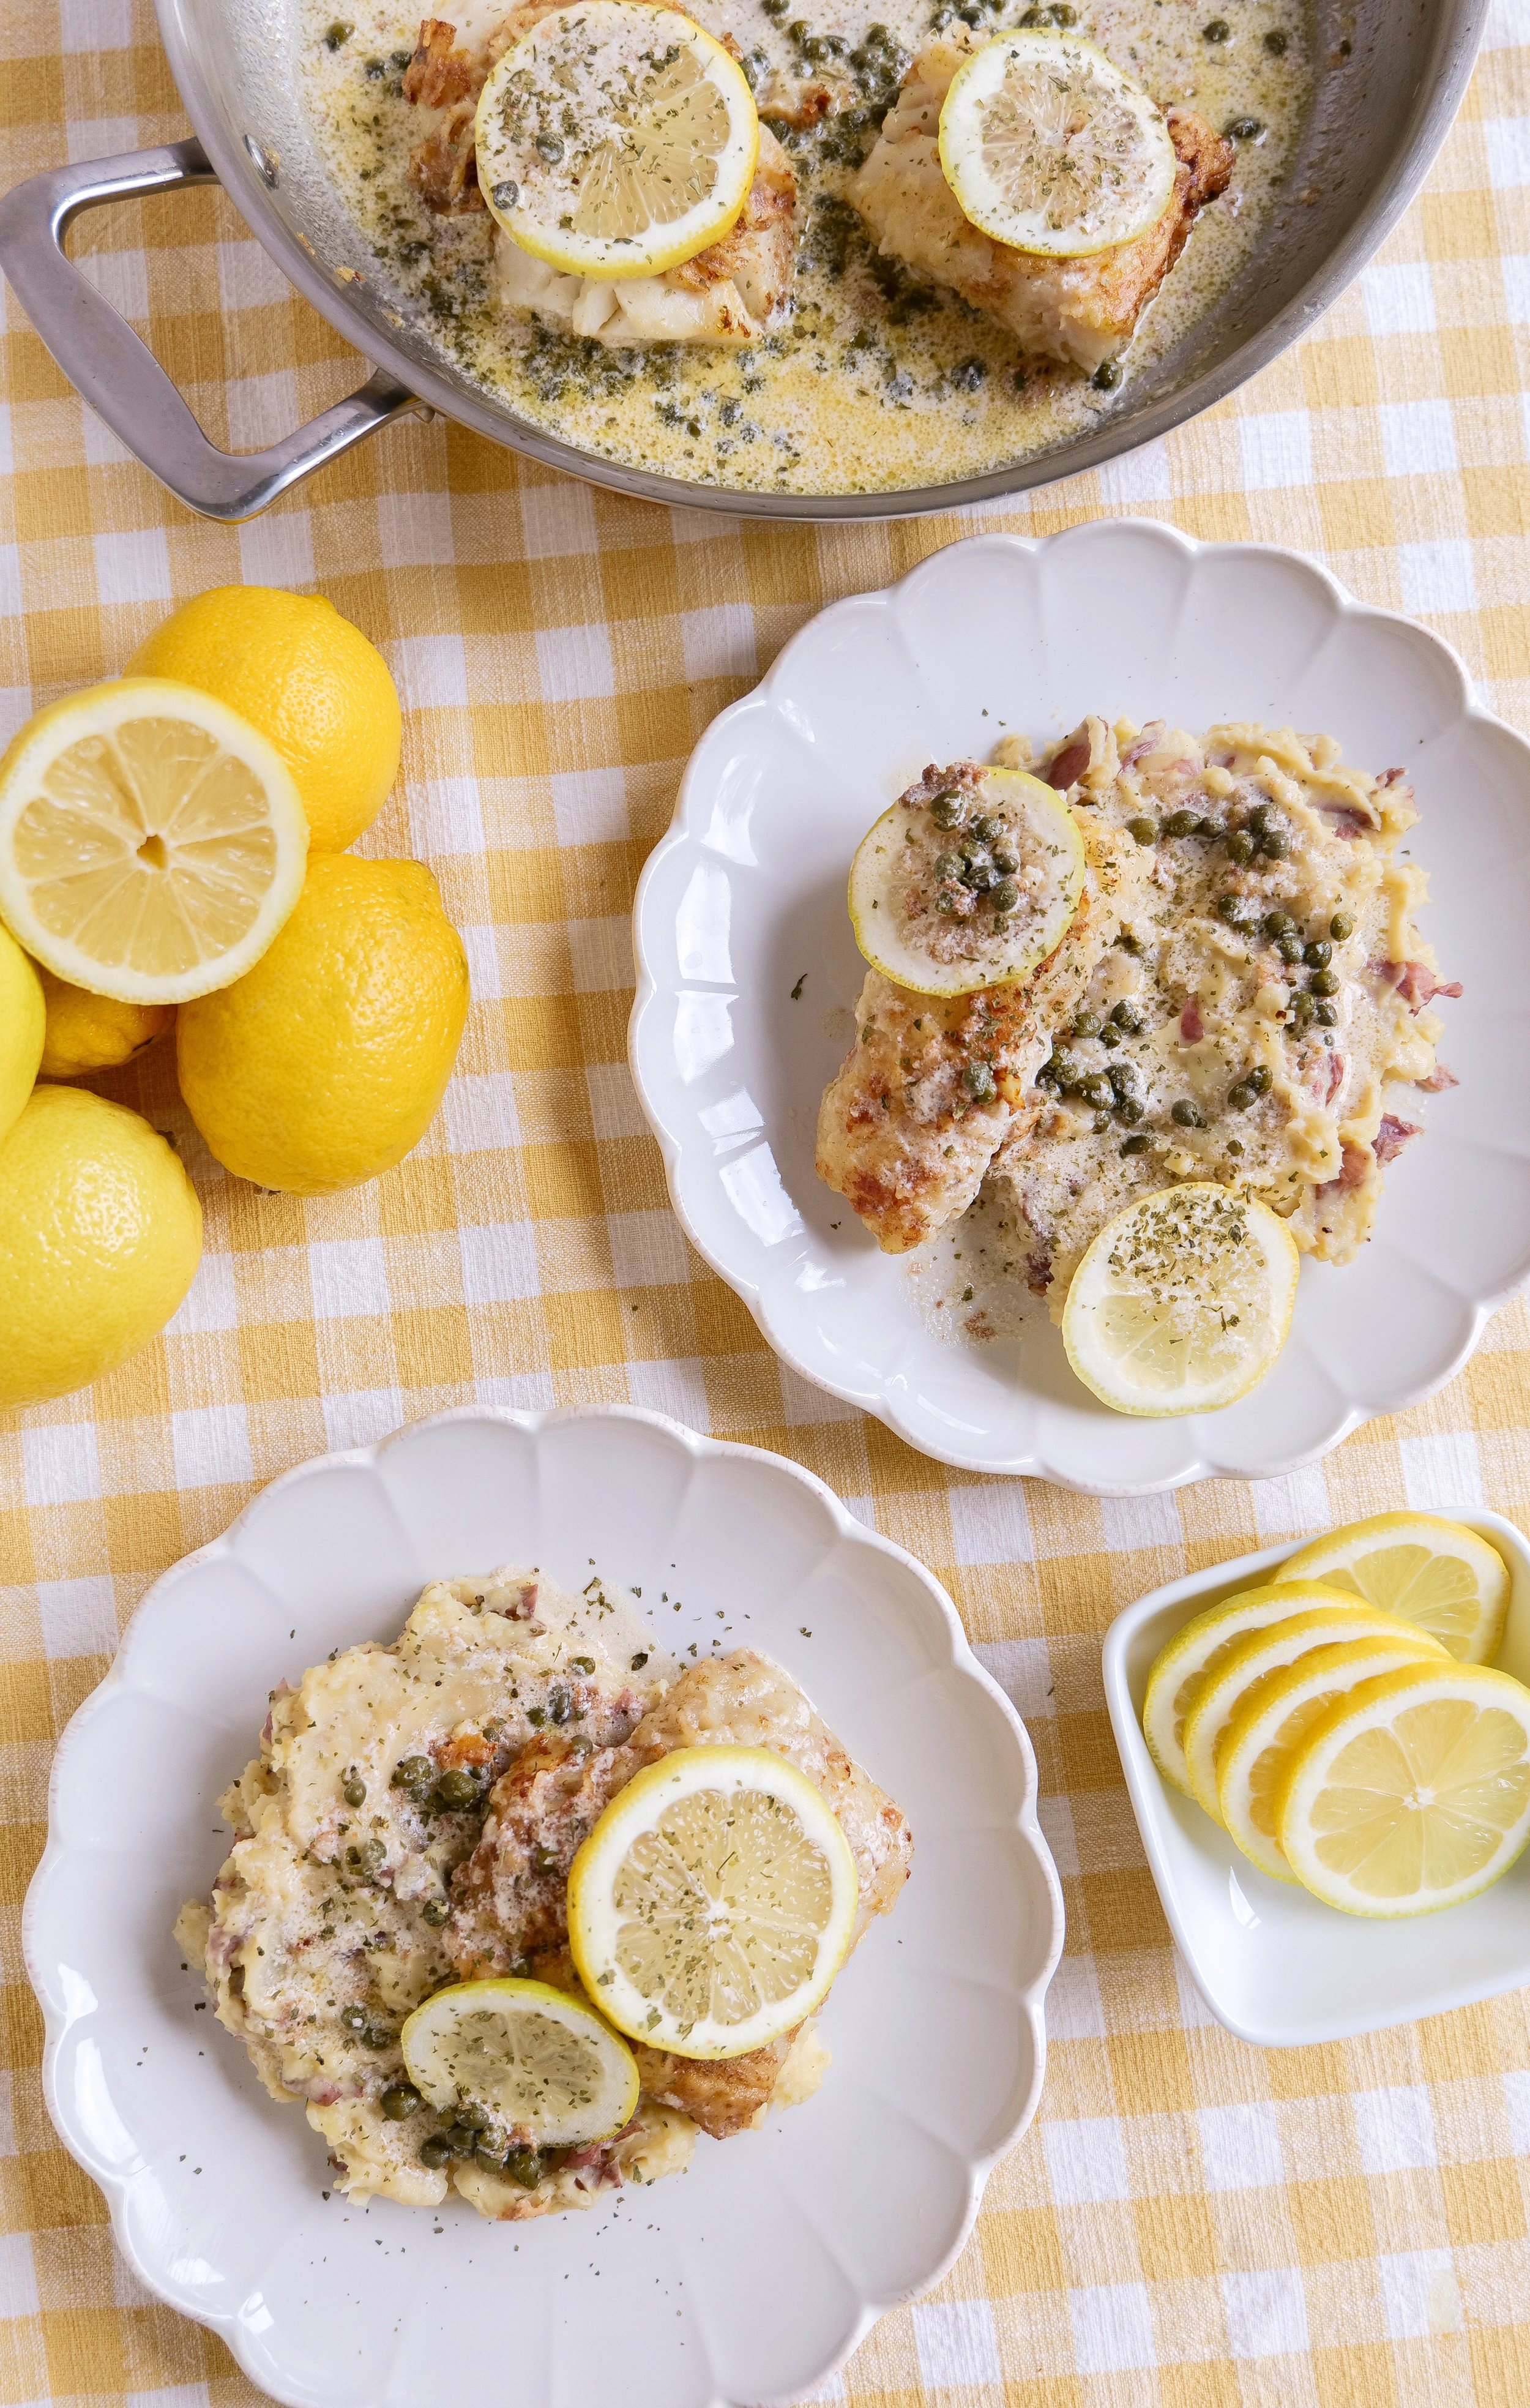
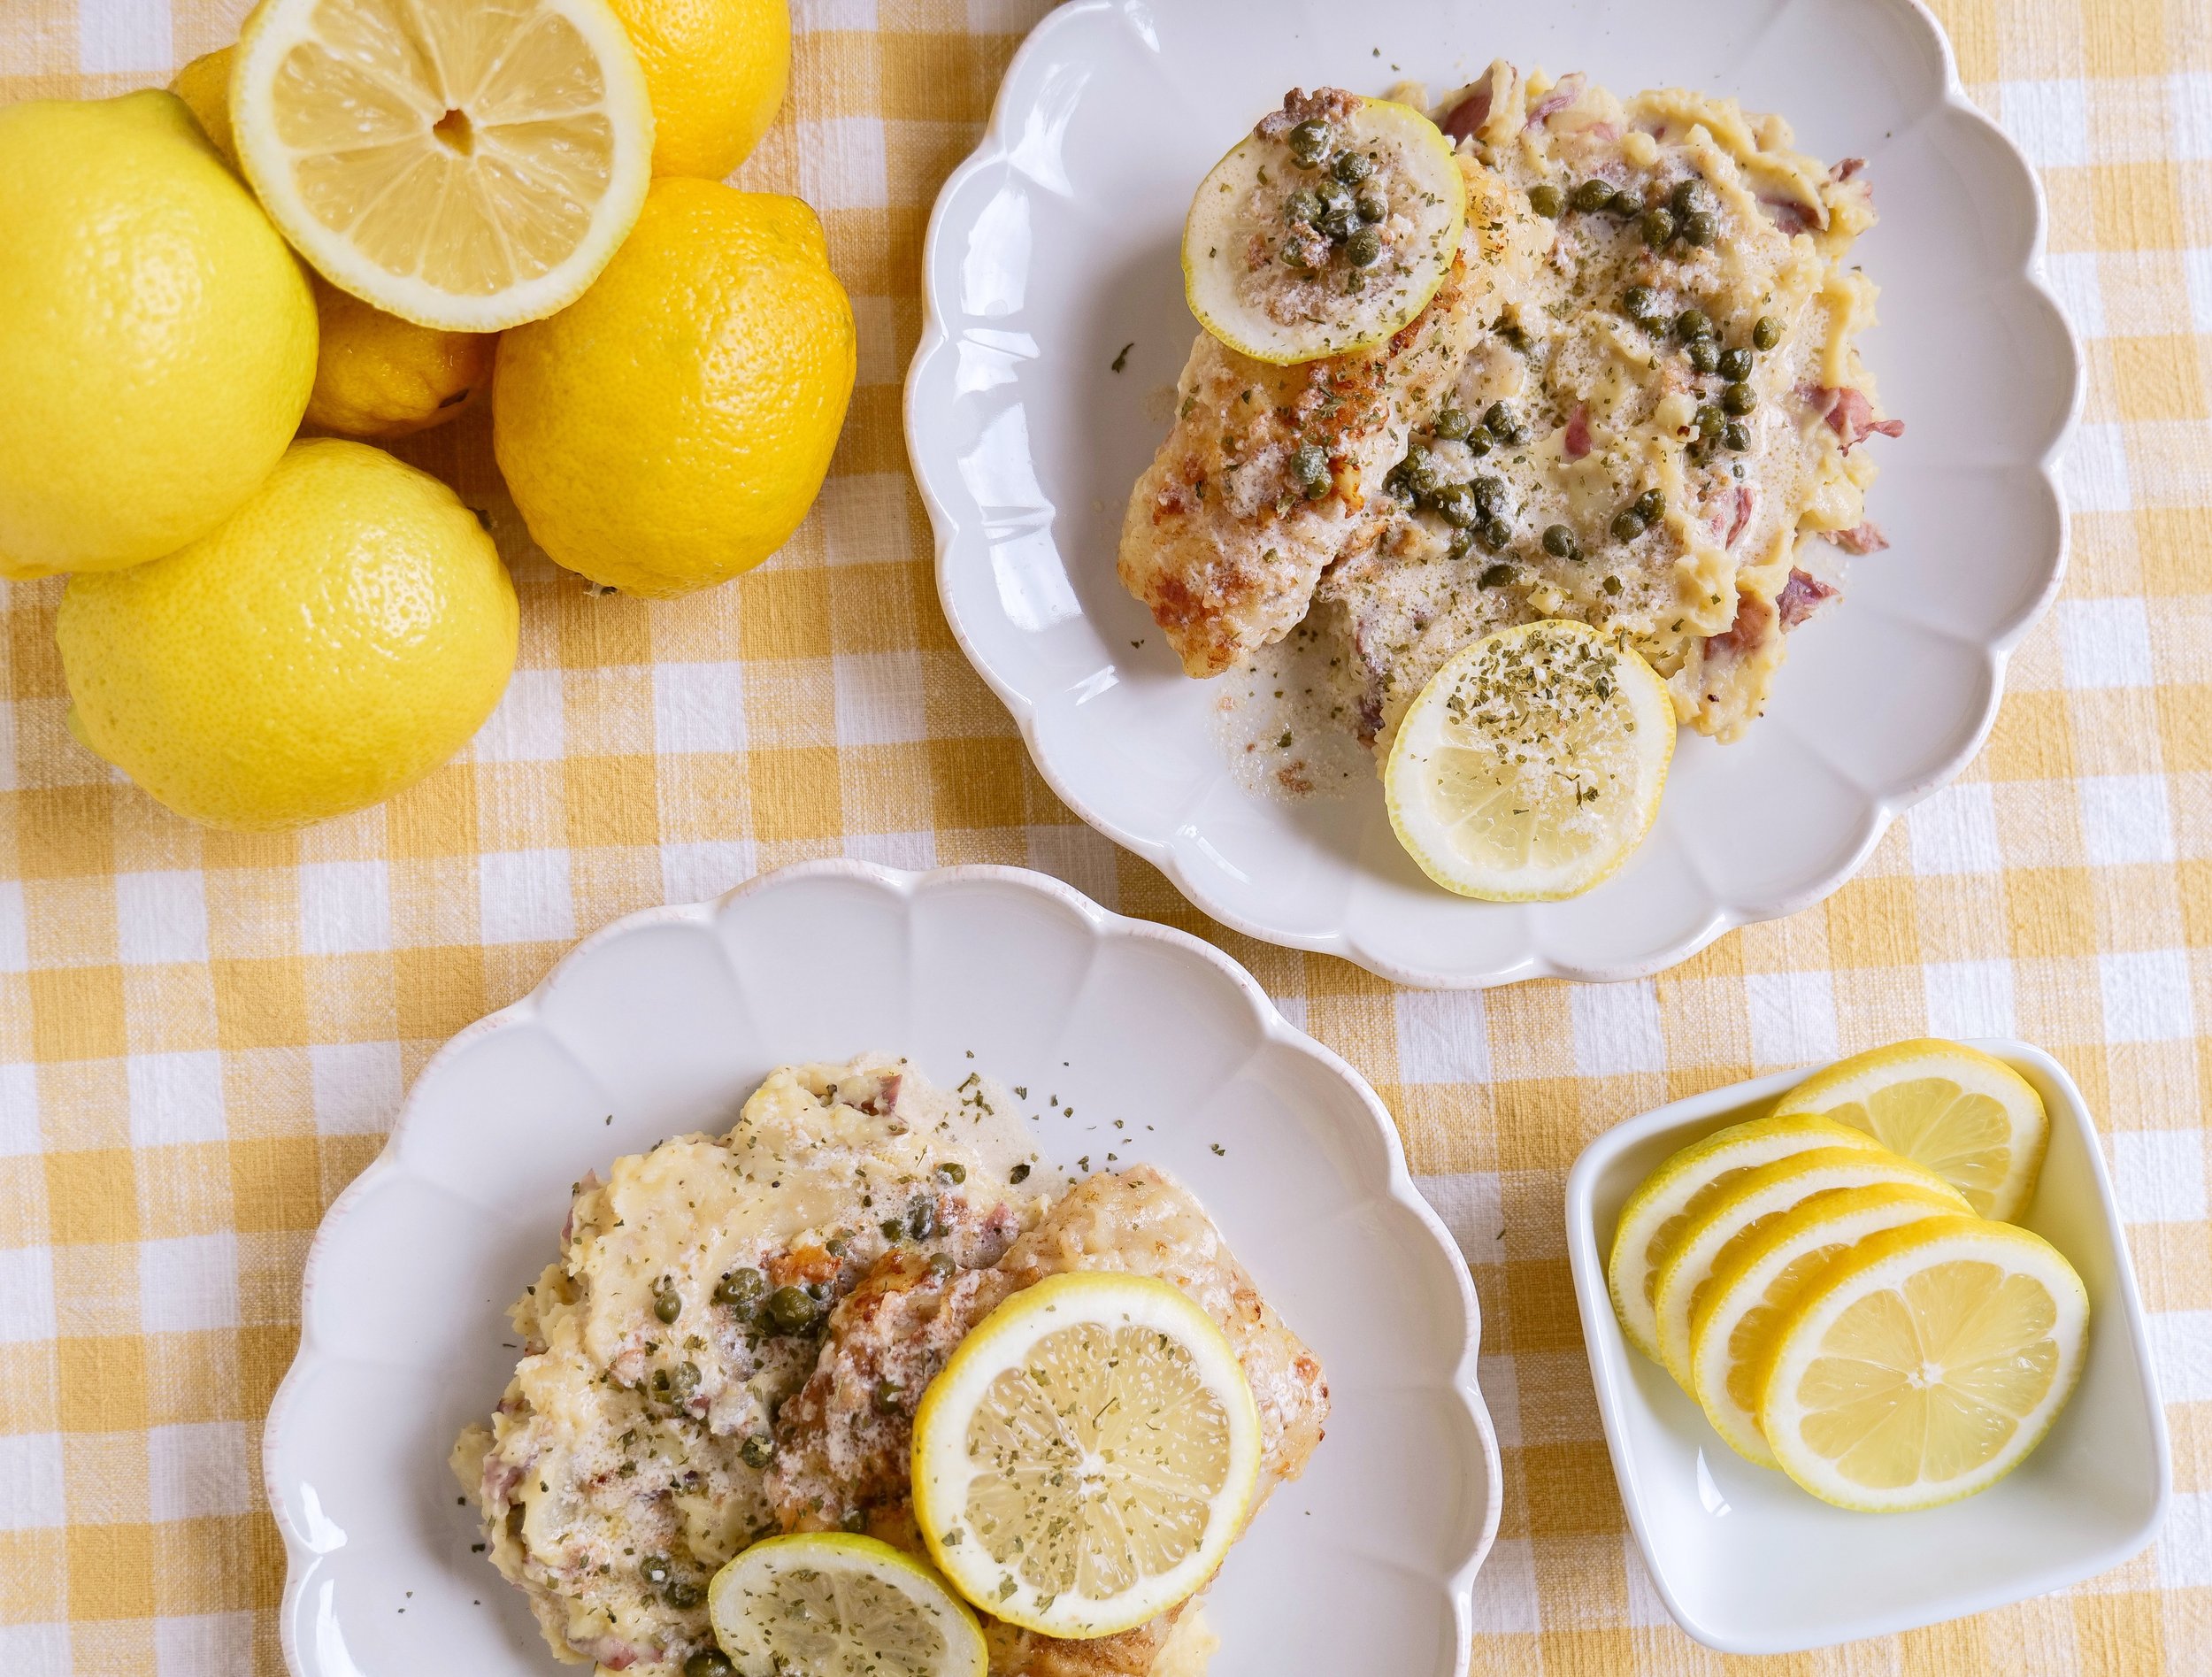
This delicious Cod Piccata is a simple yet elegant dish that's sure to please any palate. The combination of the crispy cod fillets with the fragrant creamy lemon sauce creates a delicious flavor and texture that will have everyone at the dinner table asking for more. The best part is that it's easy to make and doesn't take a lot of time. Whether you're looking for a simple weeknight dinner or a special meal for a special occasion, this Cod Piccata recipe is sure to be a hit.

What is Piccata?

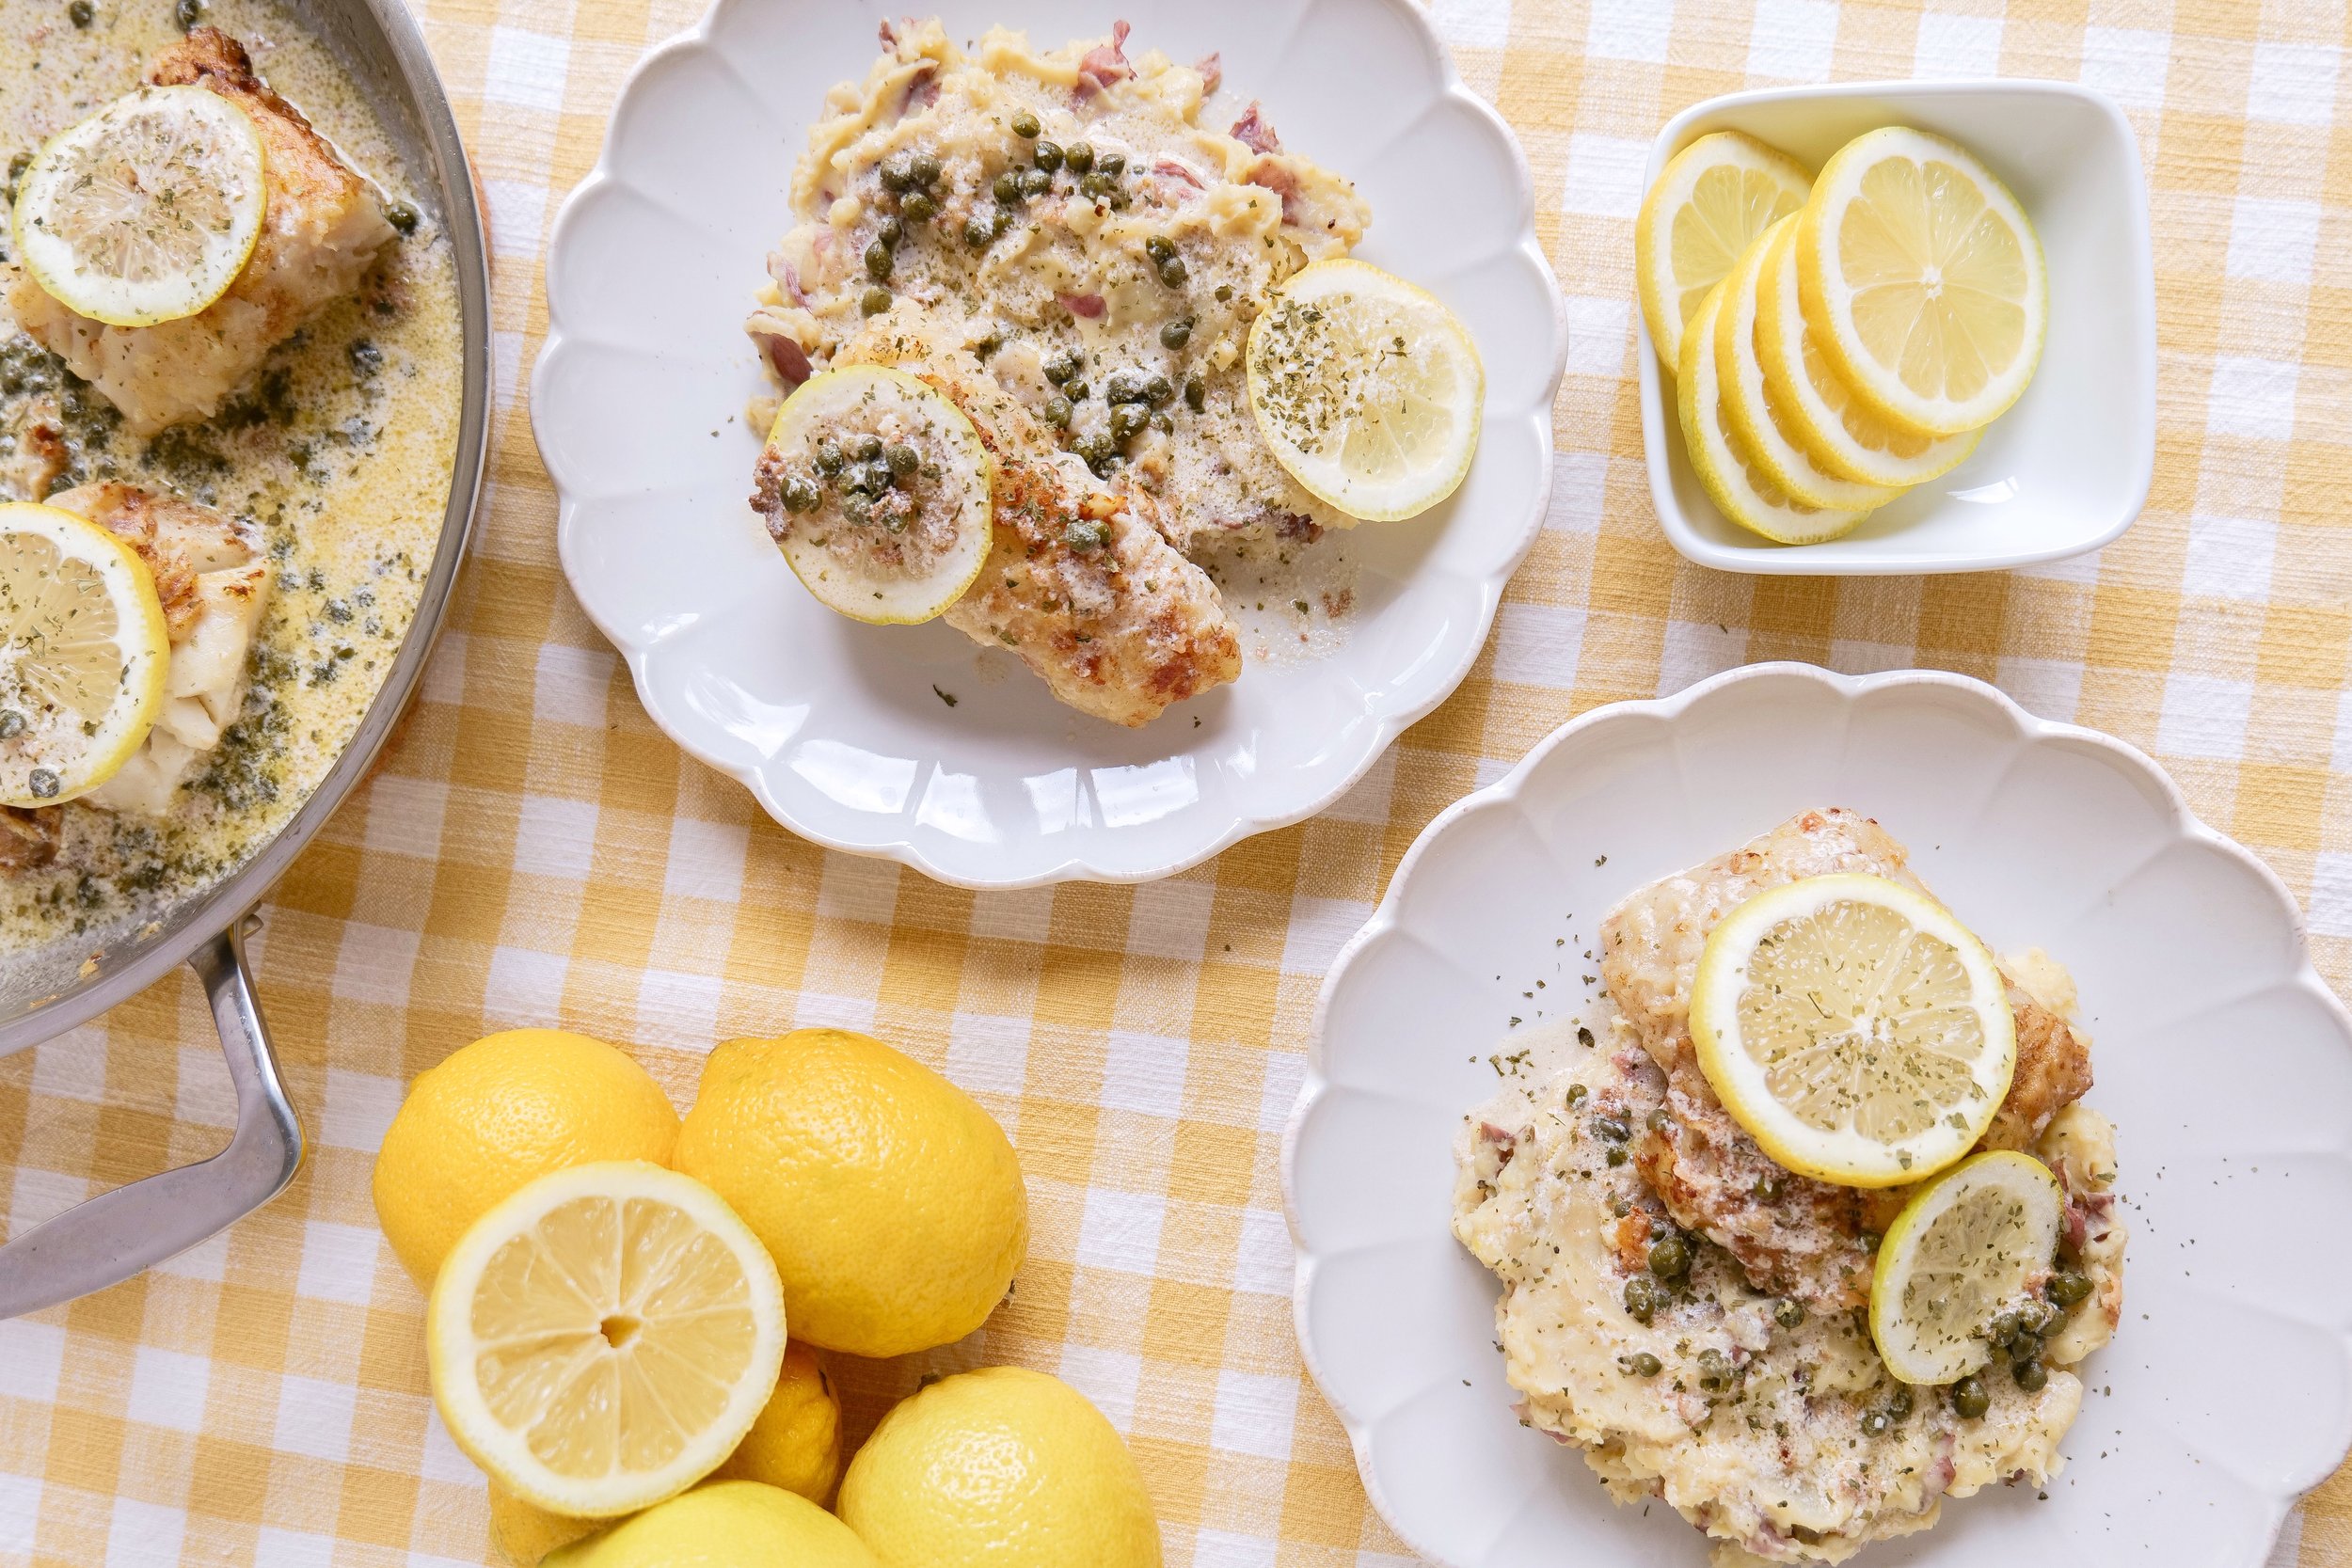
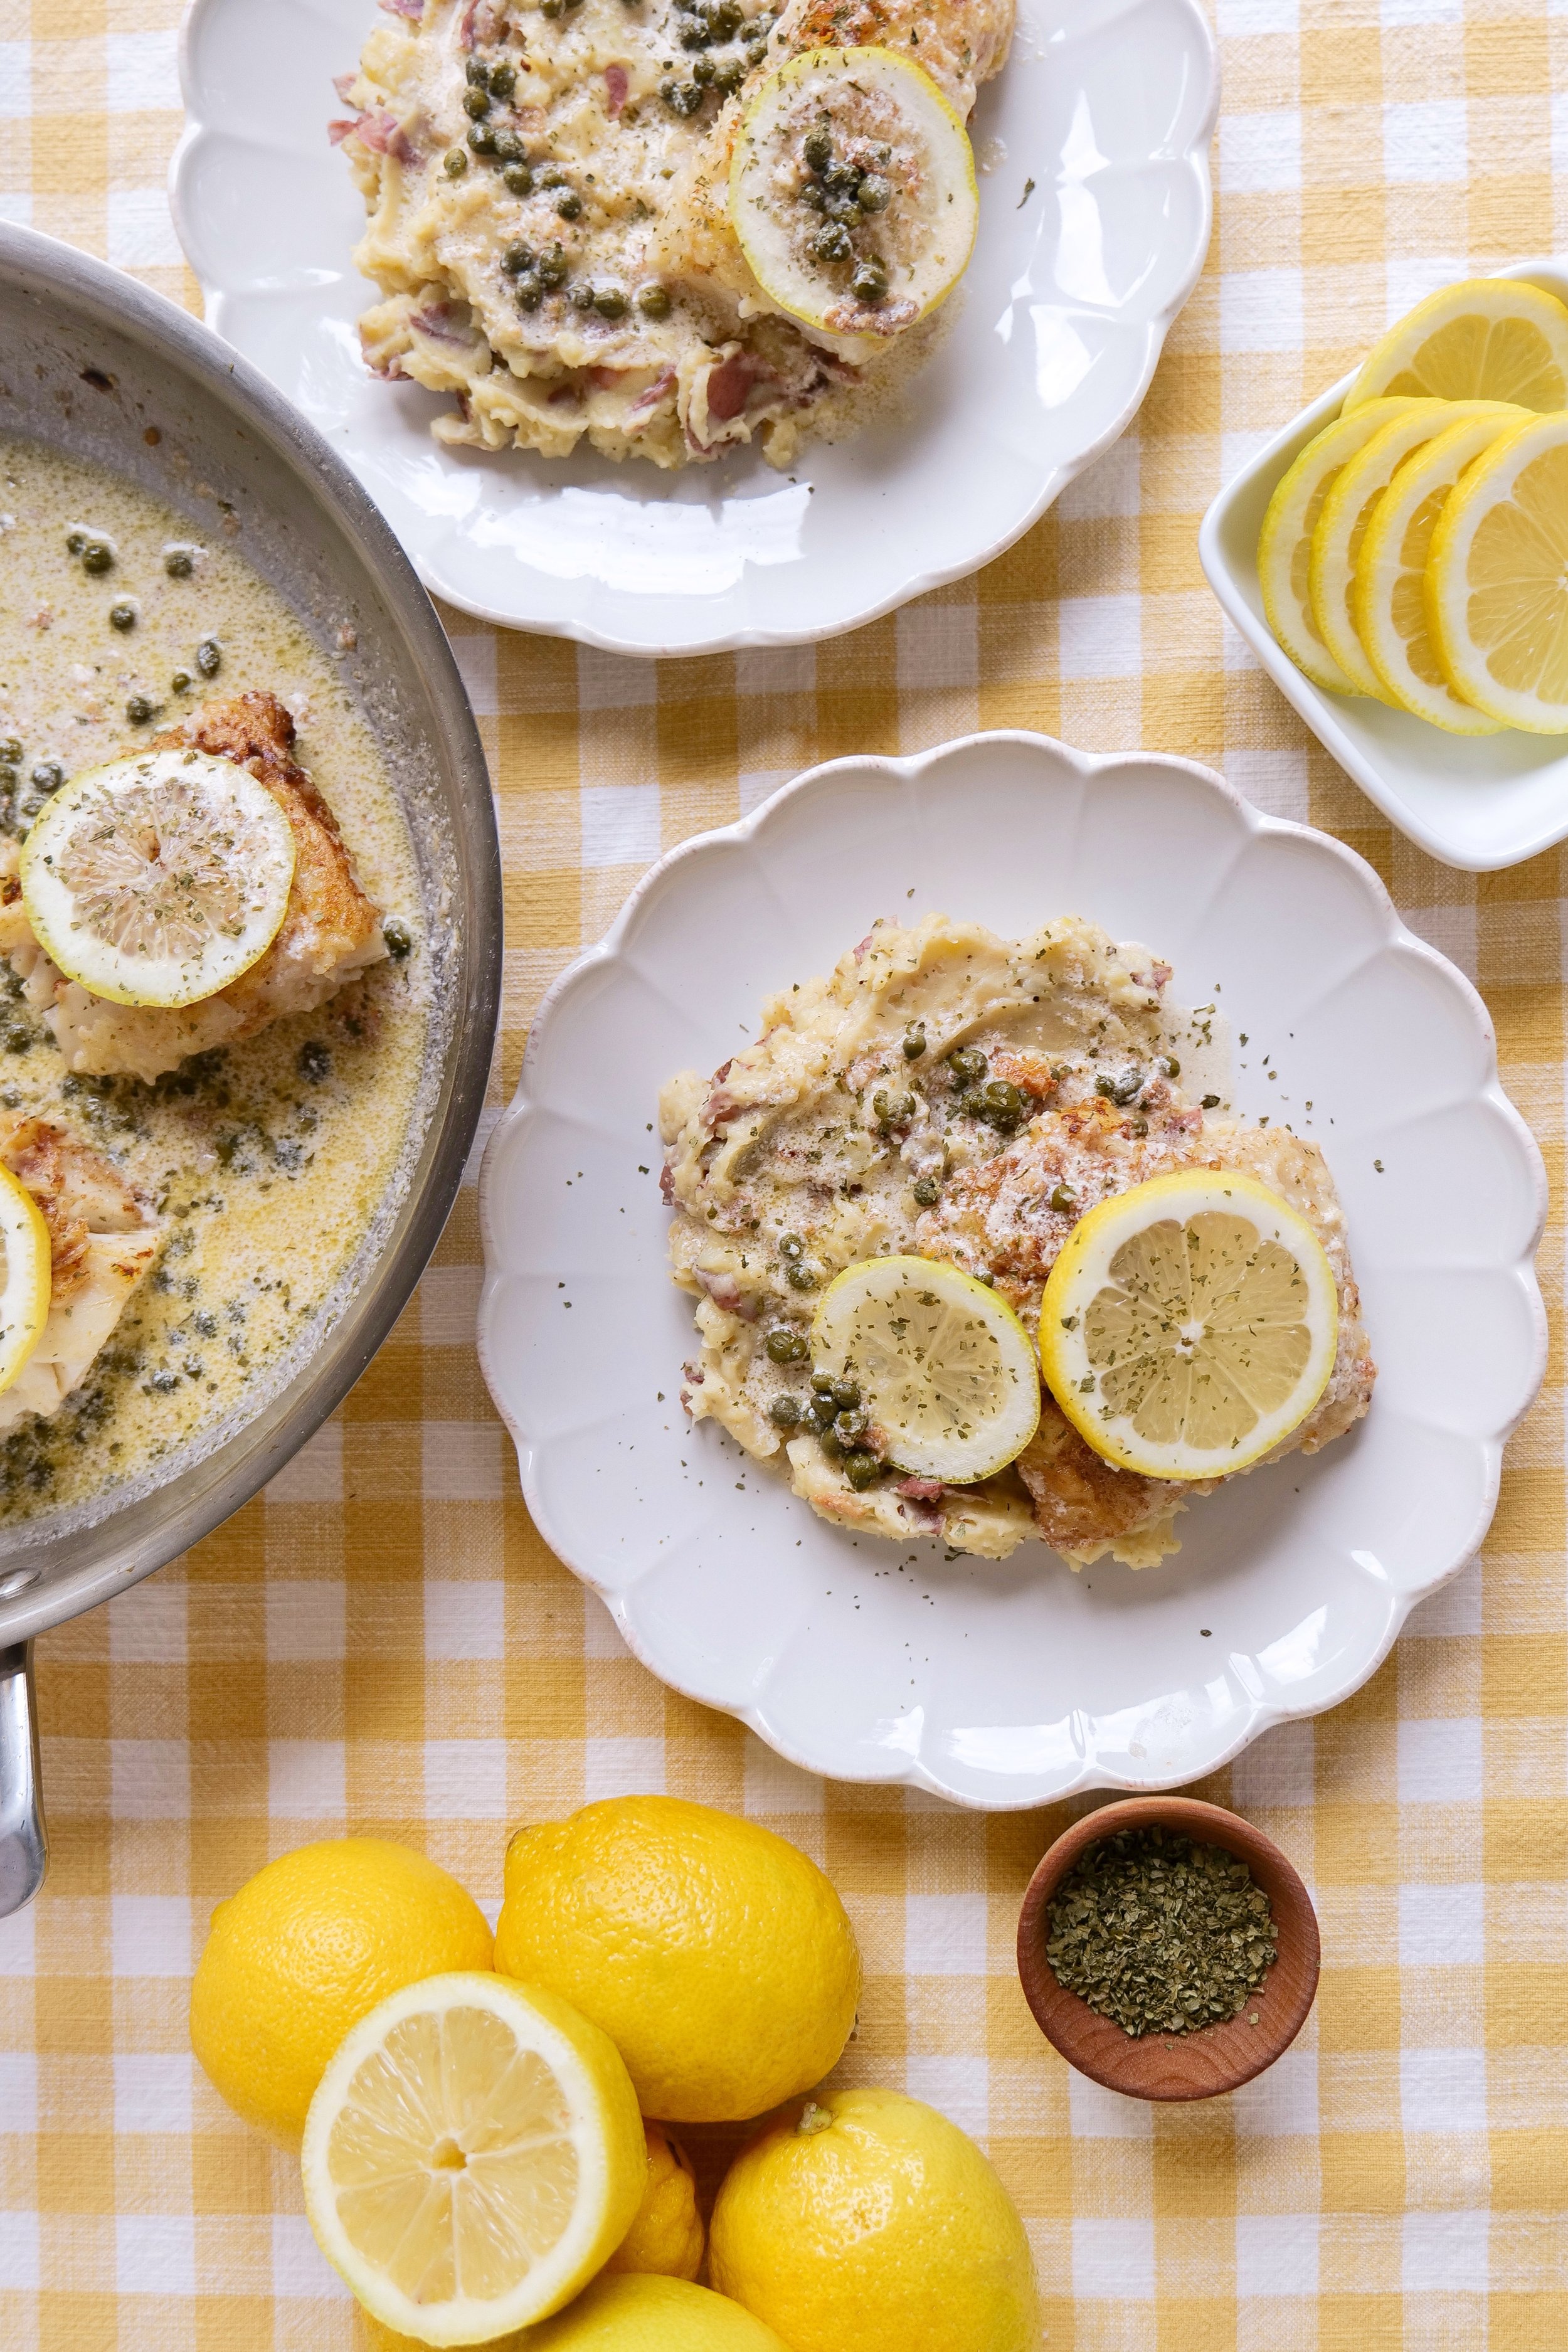
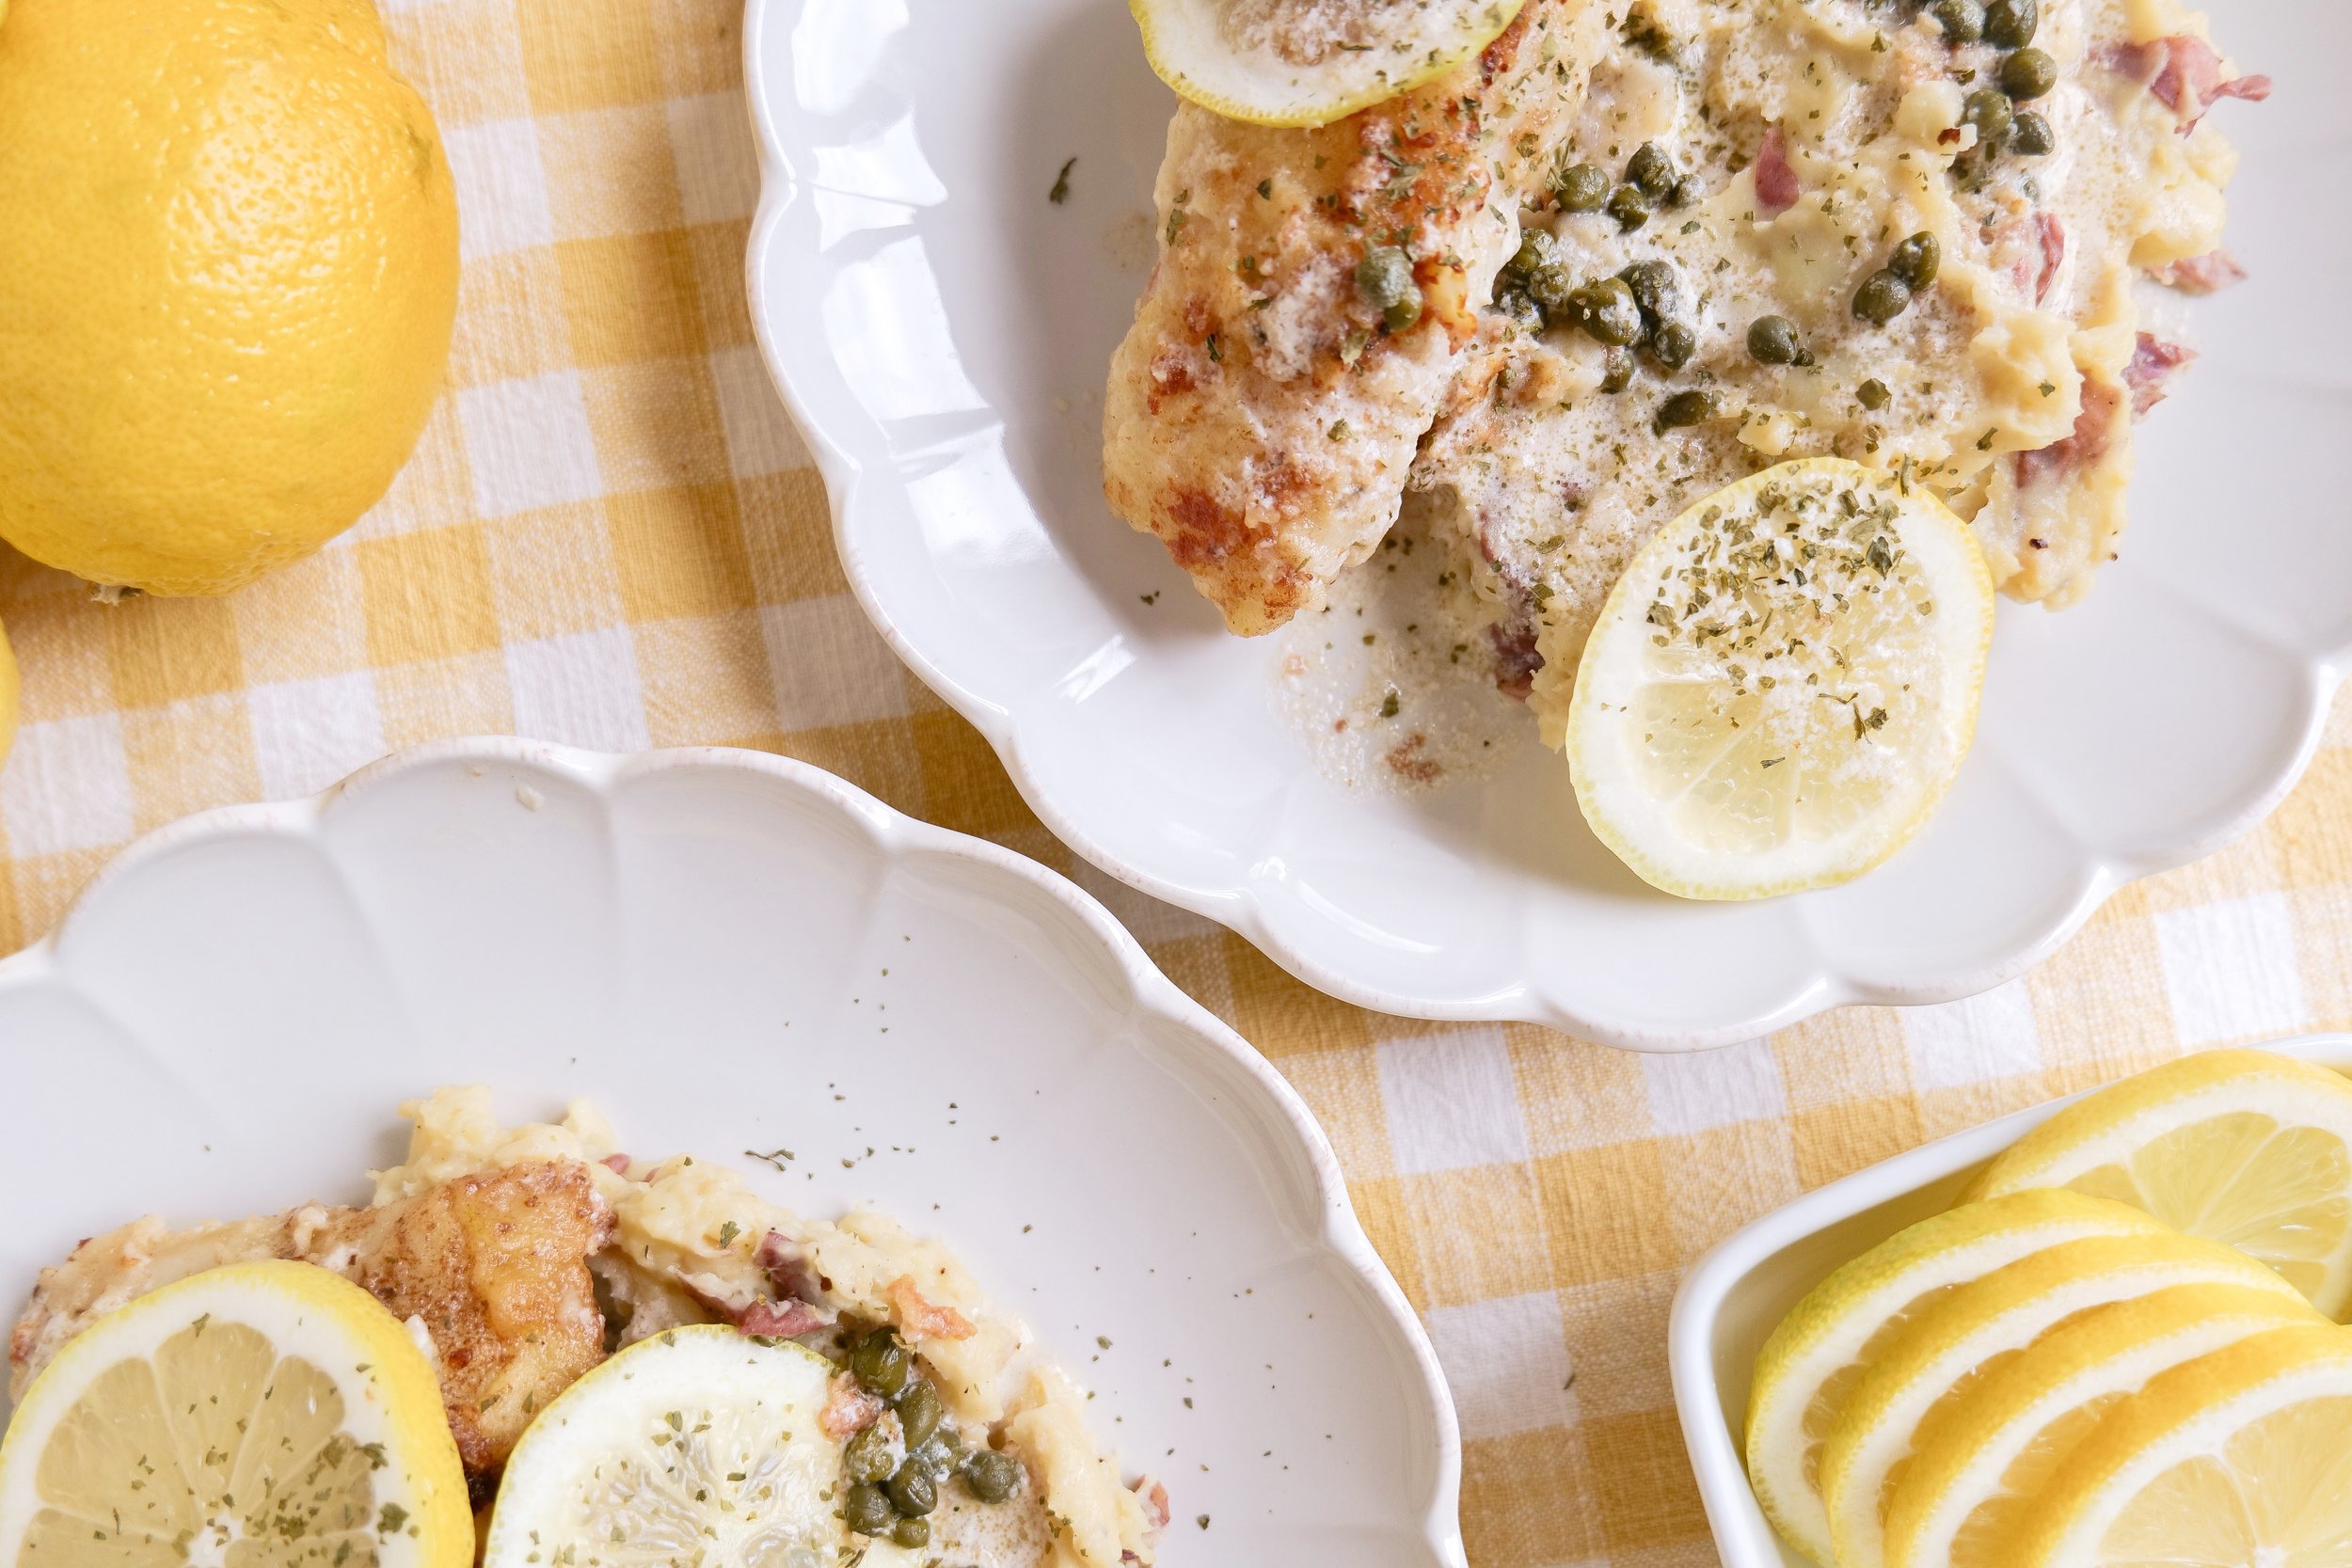
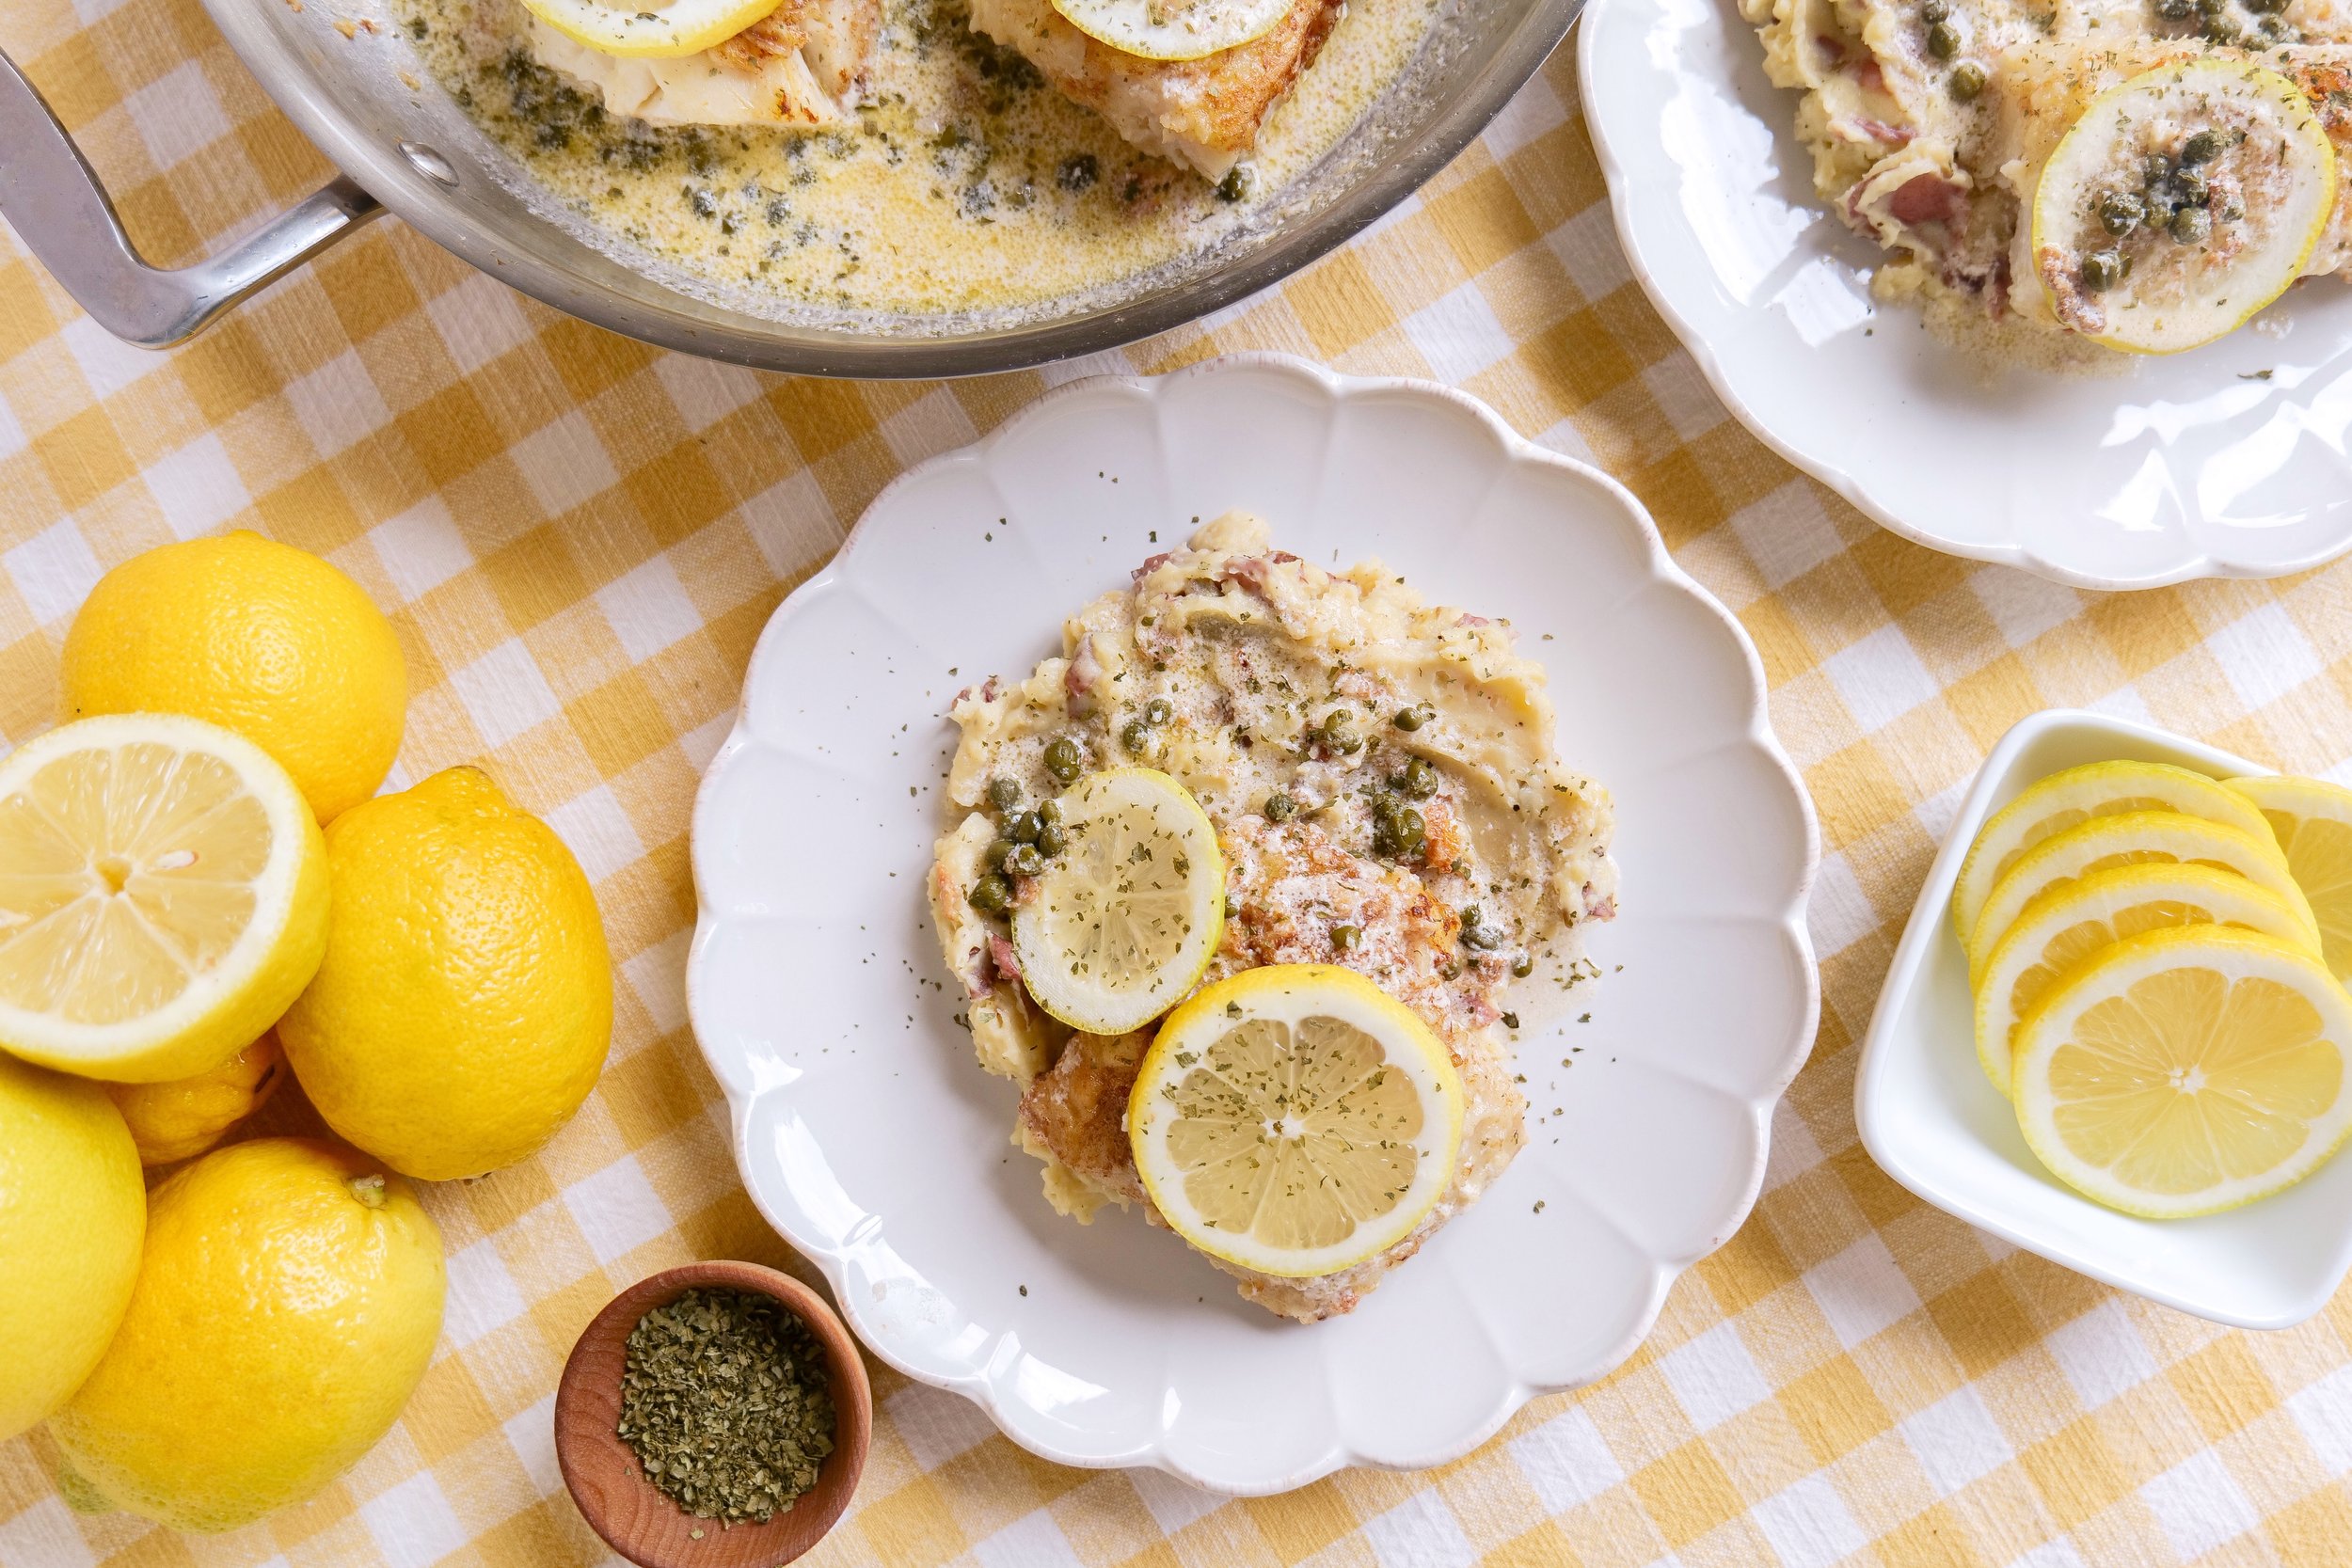
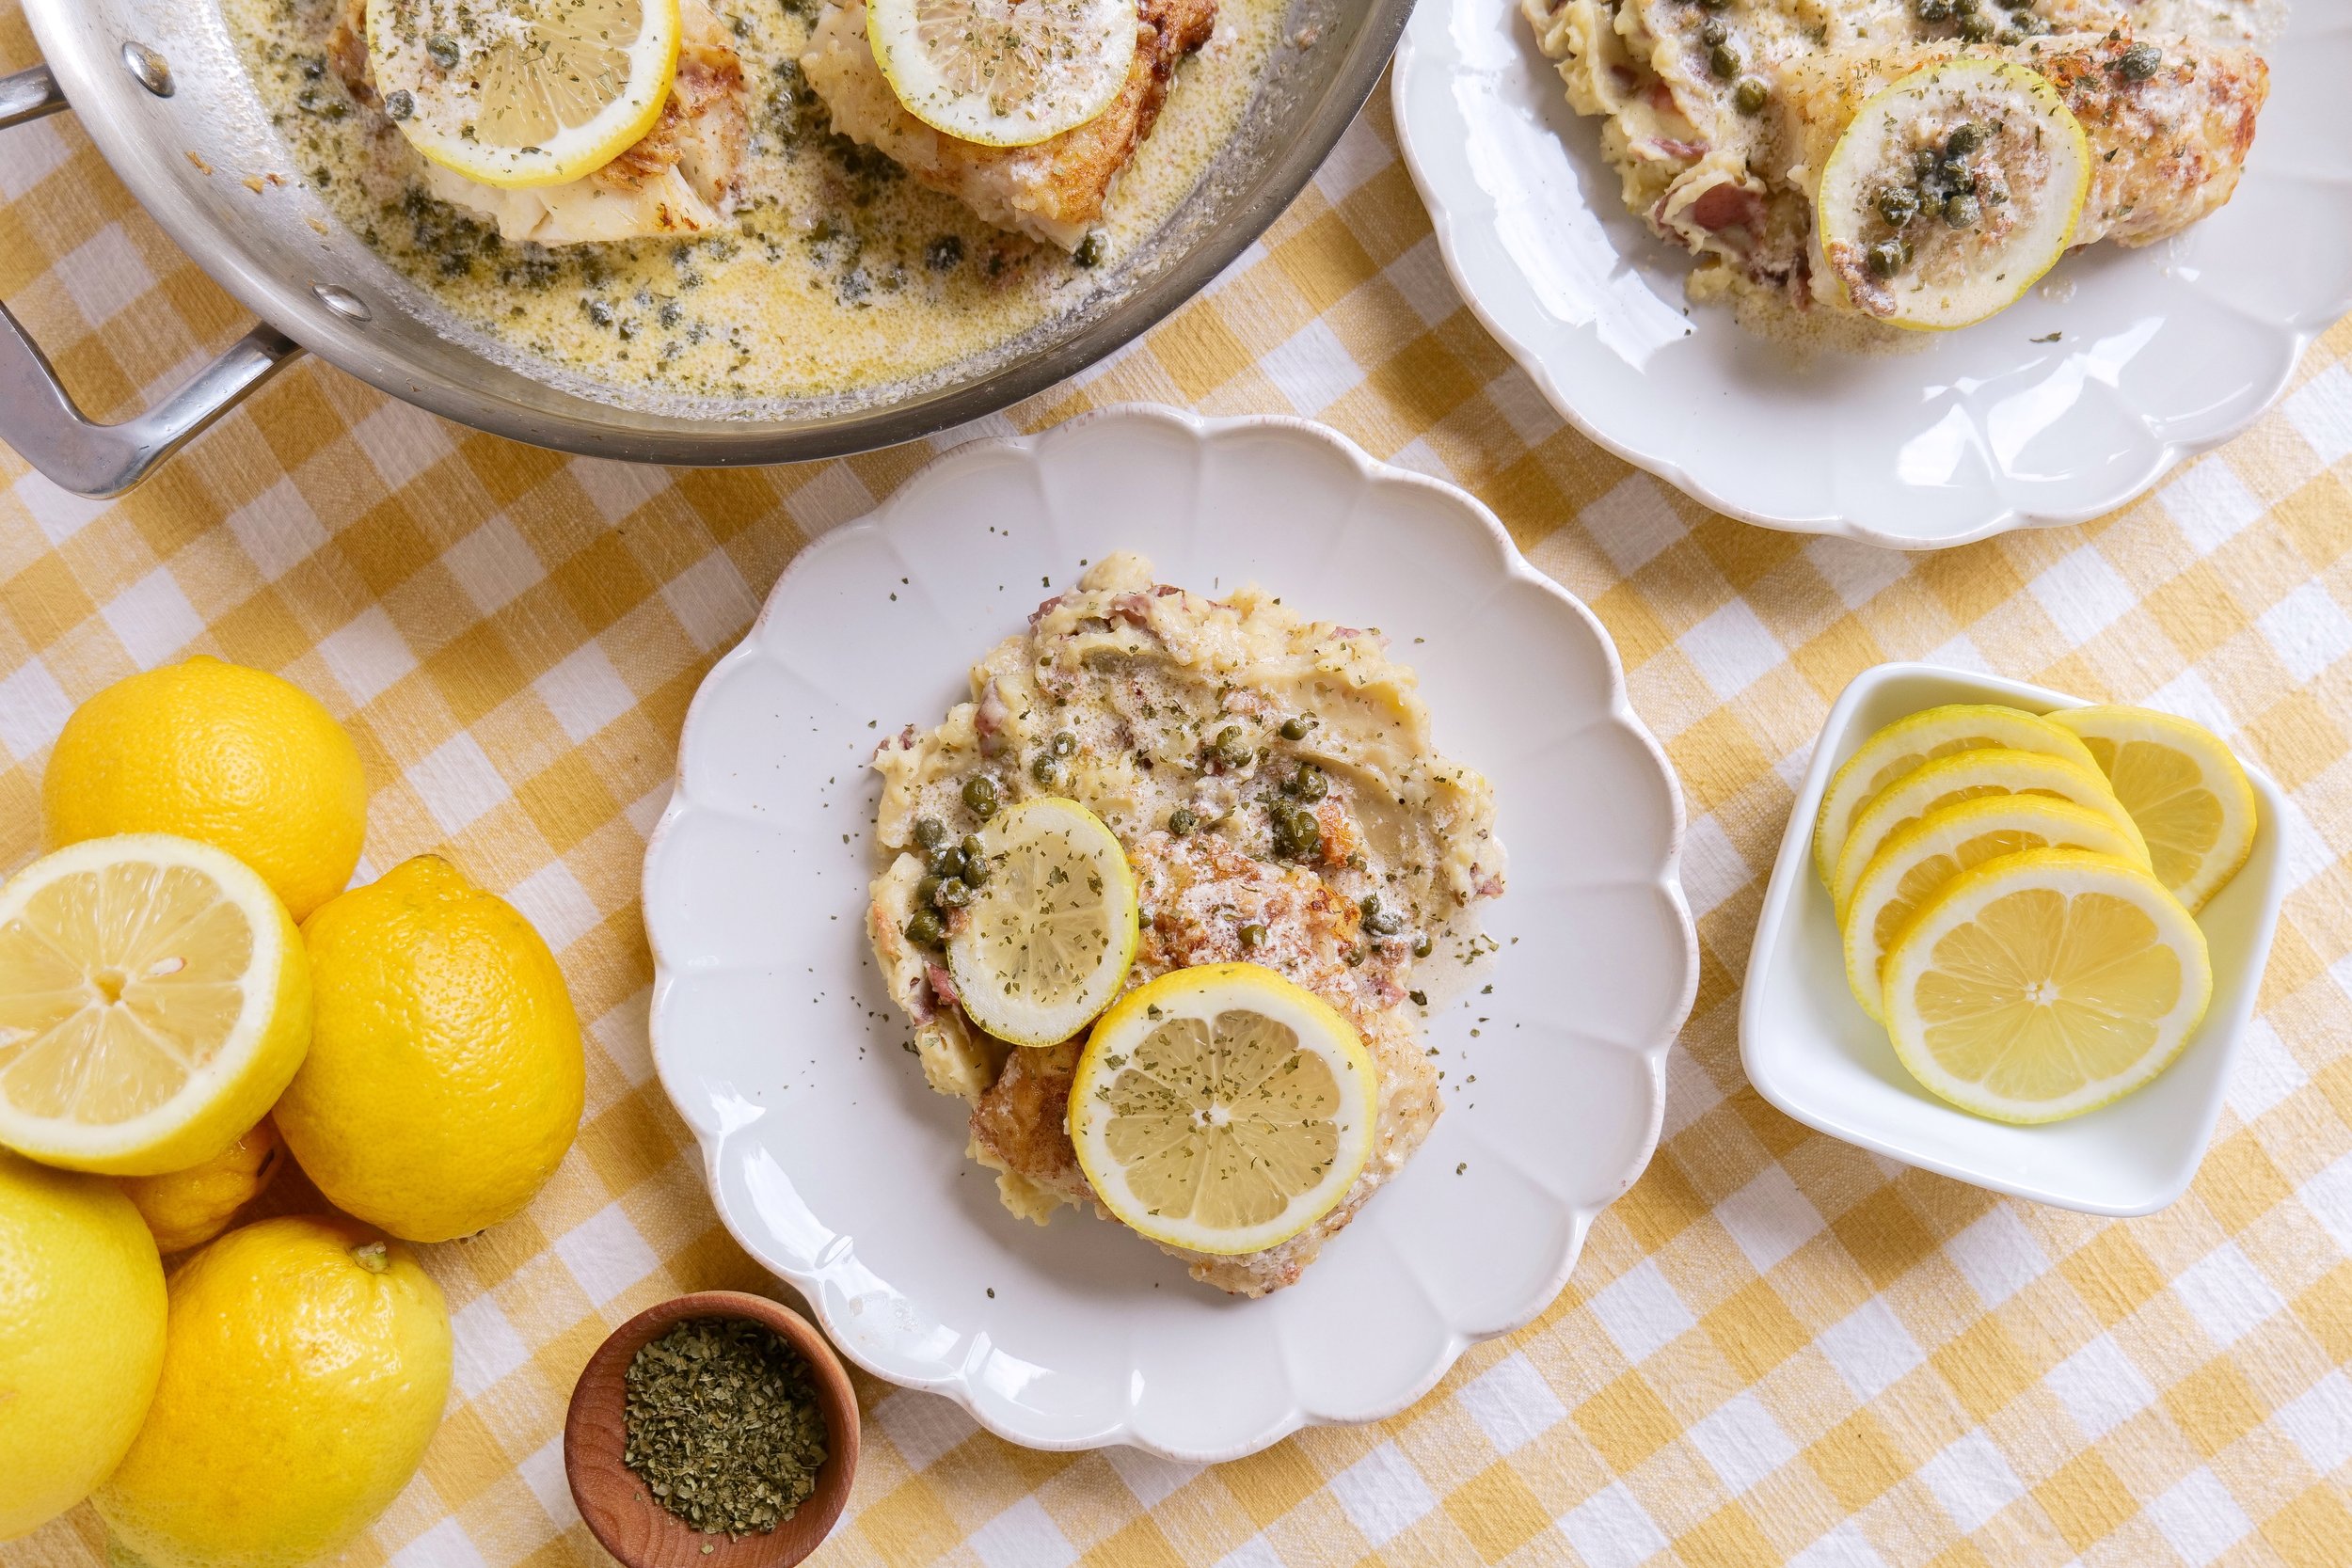
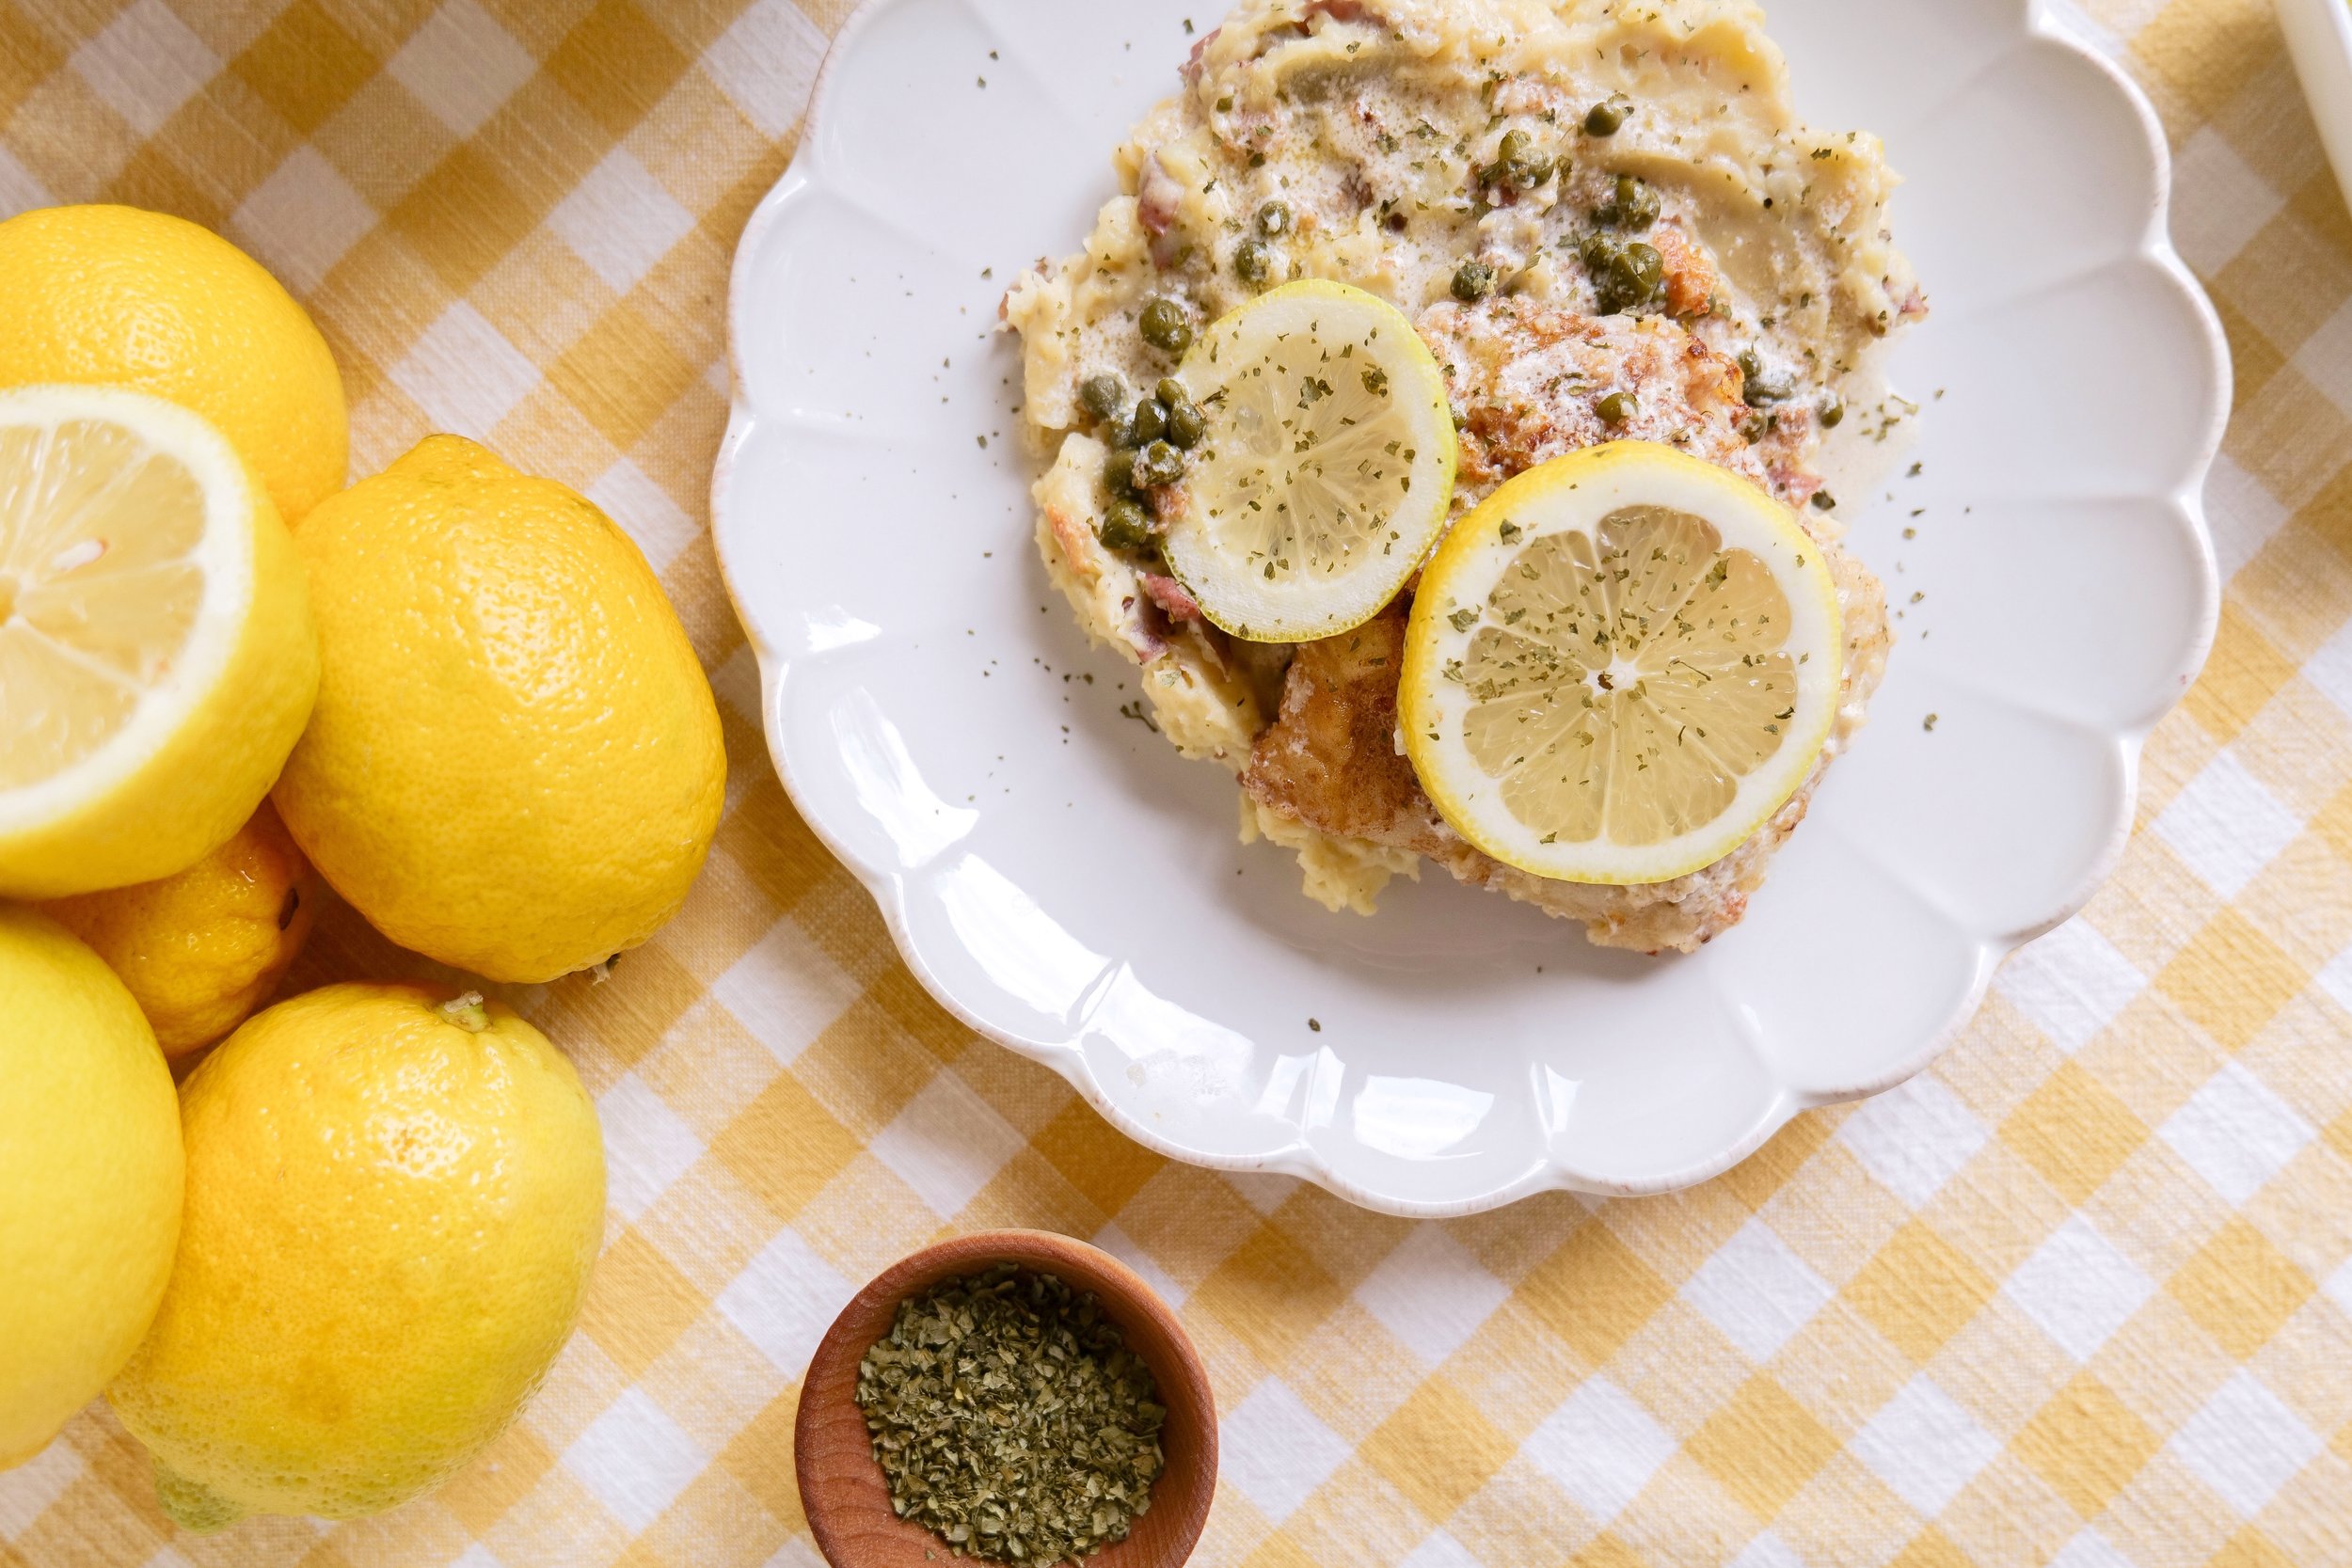
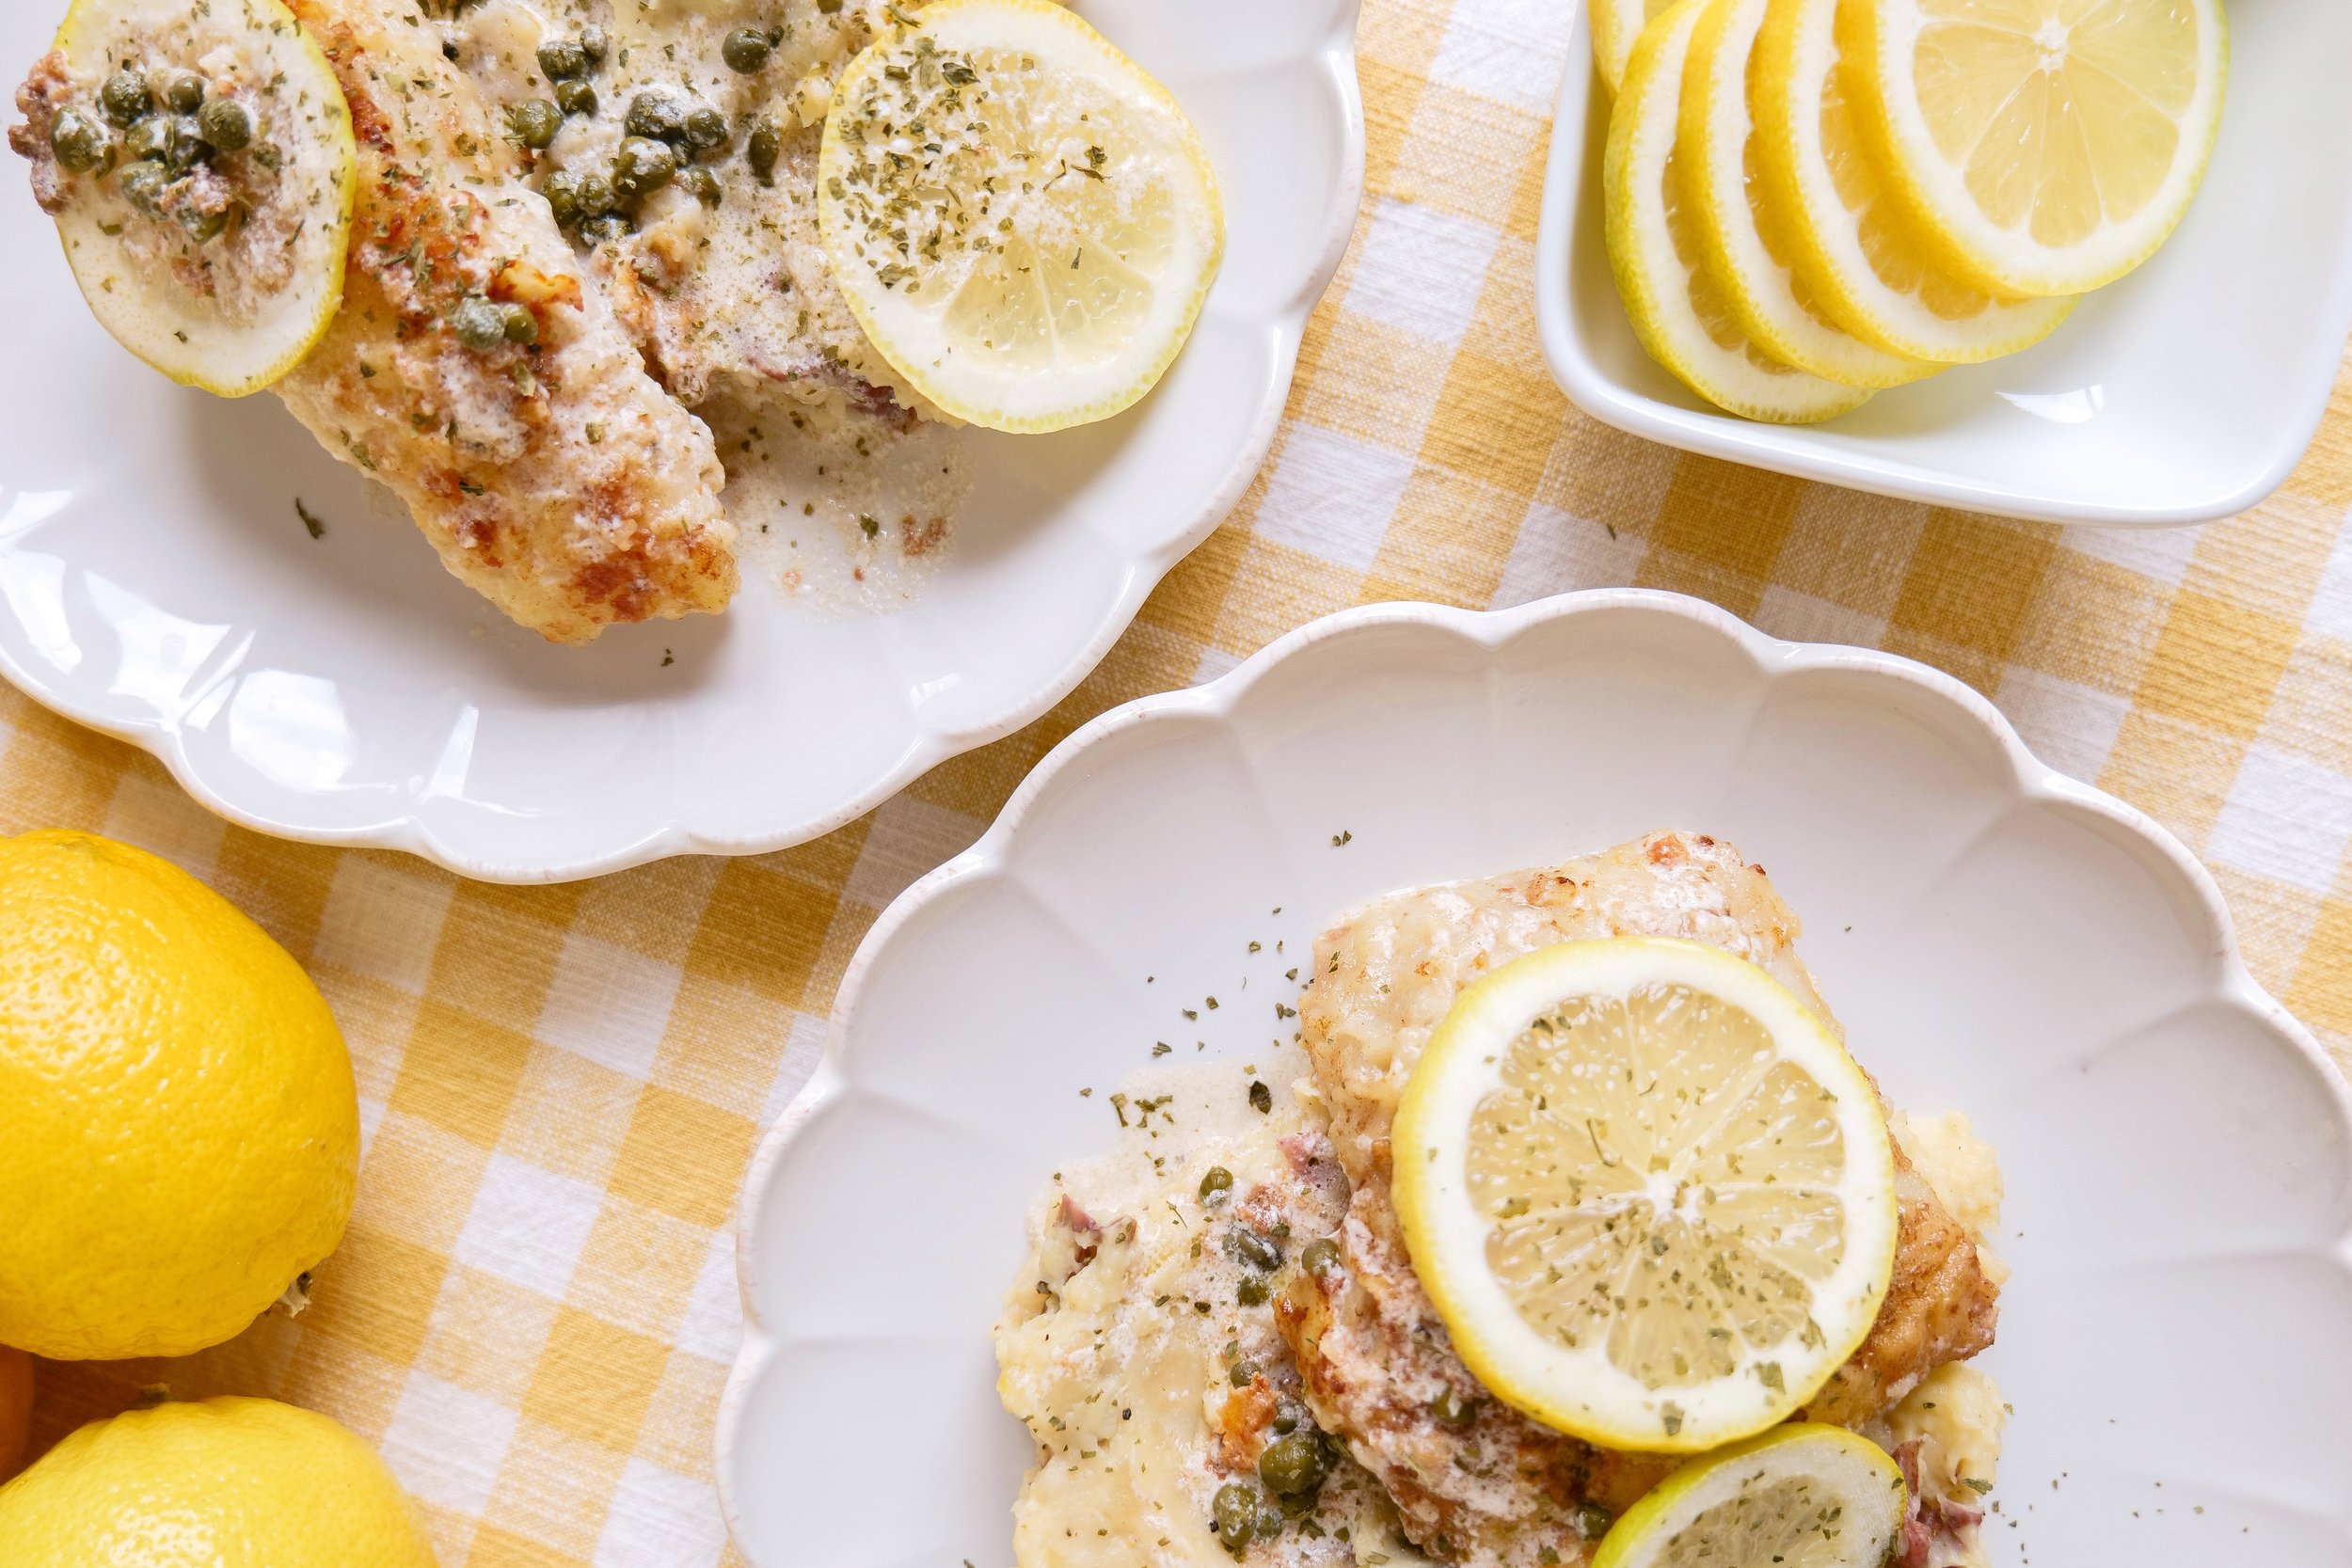
Cod Piccata is an Italian classic that can add a flavorful and elegant touch to any meal. The word piccata is Italian for "sliced thin," and is typically used to describe a dish prepared with butter, lemon juice, and capers. This classic Cod Piccata dish is made with pan-fried cod fillets cooked in a light lemon butter sauce with capers. The cod fillets are then garnished with fresh parsley and lemon slices for a bright and flavorful dish. For a delicious and easy meal, try making this Cod Piccata. The bright flavors of the lemon butter sauce and the capers are sure to bring a touch of Italian elegance to your table. Enjoy this classic Italian dish with your family and friends for an unforgettable culinary experience.

Is Cod Fish healthy?

Cod is an excellent choice for those looking to improve their health and nutrition. Not only is it a lean, white fish packed with protein and omega-3 fatty acids, but it is also low in calories and rich in iron, calcium, magnesium, phosphorus, potassium, vitamin B-12, vitamin D, and folate. Eating cod can help lower cholesterol levels and reduce the risk of heart disease, making it a great choice for a healthy diet. For those looking for a delicious way to include cod in their diet, try this easy cod piccata recipe. The ingredients in this recipe are simple and include butter, capers, garlic, broth, and lemon juice, which combine to create a rich, savory sauce. The cod is lightly pan-fried in butter for a crispy texture, while the capers and garlic add a zesty flavor. The lemon juice creates a bright, acidic sauce that pairs perfectly with the cod. Serve over a bed of pasta or with a side of roasted vegetables for a satisfying, healthy meal.

Storing leftovers

This cod piccata recipe is a delicious and easy-to-make meal that will have your family asking for seconds. Not only is it bursting with flavor, but it's also a great way to make dinner in a hurry. Once it's cooked, you can store the cod in an airtight container in the refrigerator for up to three days. To make sure that you don't waste any of the delicious sauce, keep it in a separate sealed container in the refrigerator for up to three days as well. When you're ready to enjoy the cod piccata leftovers, simply reheat the cod in a skillet over medium heat or in an oven preheated to 350°F. To reheat the sauce, put it in a small saucepan over medium heat and stir occasionally. However, make sure to discard any leftovers that have been in the refrigerator for more than three days just to be safe. Enjoy!

What to serve with Cod Piccata

Cod Piccata is a classic Italian dish that is sure to delight your taste buds! This delicious recipe is made with white fish fillets that are lightly seasoned and cooked in a lemon, butter, and caper sauce. To complete the meal, serve it with a variety of side dishes. A great option is to serve it with a light and fluffy Rice Pilaf. You can also add a side of warm French Bread for a delicious accompaniment. If you’re looking for a flavorful vegetable side dish, try steamed broccoli, roasted asparagus, sautéed green beans, roasted tomatoes, mashed potatoes, roasted sweet potatoes, garlic-sauteed spinach, or roasted cauliflower. All of these vegetables pair perfectly with the Cod Piccata and are sure to add an extra layer of flavor to the dish. For a complete meal, serve your Cod Piccata with one of these delicious side dishes and a glass of white wine. Your family and friends will love this classic Italian dish that is sure to become a regular favorite in your home.

Ingredients

4 cod fillets

1/3 cup flour (can also use almond flour is you want gluten free)

1/2 teaspoon salt

1/4 teaspoon black pepper

1/4 cup butter or extra virgin olive oil

3 garlic cloves, minced

3/4 cup chicken stock

1/4 cup heavy cream

3 tablespoons lemon juice

1/4 cup capers, drained

1 lemon thinly sliced

2 tbsp fresh parsley, chopped

Instructions

1. Mix these three ingredients together on a large plate or shallow bowl: flour, salt and pepper. Pat dry cod and set aside. Add skillet to stove top over medium-high heat. Add in butter and let melt while pan heats.

2. Add cod one piece at a time to the flour mixture making sure to lightly cover every inch. Once the pan is fully heated and the butter is melted add cod pieces.

3. Cook cod for 5-6 minutes per side (more or less depending on the thickness of the cod) Once cooked on both sides set aside.

4. Add minced garlic to a hot buttery pan and saute until fragrant, around 30 seconds. Pour in chicken stock into the hot pan, do not clean out beforehand. Using a spatula or wooden spoon scrape up and cod bits that may have stuck to the pan. Add in lemon juice and capers. Let come to a low simmer and completely comes together. Turn off the heat and add in heavy cream. Stir completely to incorporate. Add back in cod and place sliced lemons on top. Serve over a bed of pasta, rice, or mashed potatoes pouring additional liquid in a pan over top and enjoy!

Other Delicious Dinner Recipes:

The Perfect Pair: Chicken Picatta and J. Lohr Wine

Delicious and Easy Chorizo One Pan Dinner

The Perfect Summer Meal: Grilled Chicken, Mexican Street Corn & Cucumber Salad

An Alluring Combination: French Onion & Shallot Soup Recipe

A Sweet and Delicious Recipe for Lemon Poppyseed Bread

Are you looking for an easy and delicious treat to make? Lemon poppyseed bread is a classic that anyone can enjoy! This bread is a tried and true favorite that has been around forever, and it is sure to become a go-to recipe for your family. Whether you're looking for an afternoon snack, a sweet breakfast, or a unique and beautiful dessert, this bread will be a hit. With just a few ingredients, you can make a flavorful and moist bread that is perfect for any occasion. Let's dive into the recipe and see how to make the perfect lemon poppyseed bread!

Tips to Make the Best Lemon Poppy Seed Loaf

Lemon Poppyseed Bread is a classic dessert that's perfect for any occasion. Its bright, tangy flavor and light, fluffy texture make it a classic favorite treat. To make the best loaf of Lemon Poppyseed Bread, it’s important to use freshly squeezed lemon juice and zest. This will give your bread a bright and tangy flavor. Additionally, use white sugar instead of brown sugar to achieve a lighter loaf. To get the perfect texture, make sure you use the correct ratio of poppy seeds to batter. Additionally, preheat your oven and bake at the correct temperature for nice and even baking. Grease and flour your loaf pan to prevent sticking and let the bread cool completely before slicing. Once the bread is finished baking, store it in an airtight container to keep it fresh. With these tips, you’ll be sure to make the perfect loaf of Lemon Poppyseed Bread!

Can You Make This Recipe Without Poppy Seeds?

With its unique combination of sweet and tart lemon and crunchy poppy seeds, it's no wonder why this bread is so popular. But what if you don't have poppyseeds on hand or don't want to use them in your recipe? Not to worry - you can still make a delicious lemon poppyseed bread without the actual poppyseeds! All you need to do is replace the poppy seeds with a few other ingredients that will help to create a similar flavor and texture. Options include substituting chia seeds, crushed nuts, shredded coconut, or even raisins for the poppy seeds. You can also add a bit of almond extract or lemon zest to help bring out the lemony flavor. The result will still be a delicious, moist bread with a hint of lemon and crunch.

Making lemon poppyseed bread without poppyseeds is surprisingly easy and offers a great way to enjoy this classic treat. With just a few simple substitutions, you can create delicious bread that is just as flavorful and enjoyable as the original. So the next time you're in the mood for some lemon poppyseed bread, don't worry if you don't have poppyseeds - you can still make a delicious version without them!

Can This Lemon Poppyseed Bread Recipe Be Halved?

Halving a recipe can be a great way to save time and money, especially when it comes to baking. If you’re looking to make a smaller batch of Lemon Poppyseed Bread, you’ll need to adjust the ingredients. To halve the recipe, you’ll need to reduce the ingredients by half, including the eggs, sugar, and butter. Being this recipe makes 2 loaves you won't need to make any other adjustments to the temperature or cook time. I always do the full recipe because of how easy it is to freeze one loaf. Then I always have another loaf on hand for last-minute company or for something tart and sweet to have on hand when I get a craving.

How to Freeze Lemon Bread?

Lemon poppyseed bread is a delicious treat that can easily be frozen and enjoyed later. By freezing the bread, you can help to retain its moist texture and flavor so that it tastes just like it did when it was first baked. To freeze the bread, make sure to tightly wrap it in plastic wrap or aluminum foil and place it in an airtight container or ziplock bag. The bread can be frozen for up to 3 months.

When you are ready to enjoy the delicious lemon poppyseed bread, you can either thaw it in the refrigerator overnight & place it in a pre-heated 350-degree oven for 8-10 minutes. Alternatively, you can thaw it at room temperature for several hours before warming it in the oven. Reheating the bread will help to restore some of the moisture and make it taste as fresh as when it was first baked.

For those who love the taste of lemon poppyseed bread, freezing it is an excellent way to ensure that it stays fresh and retains its flavor and texture. Enjoy the deliciousness of lemon poppyseed bread anytime by following the simple steps outlined above.

How Do You Make Dairy-free Lemon Loaf?

Lemon poppyseed bread is an incredibly popular treat that is loved by many around the world. The combination of tart lemon and crunchy poppyseeds is a classic combination that creates an irresistible treat. Whether you’re looking for a delicious breakfast, snack, or even dessert, lemon poppyseed bread is a great option.

Making this delicious bread is surprisingly easy and can be adjusted to fit all dietary needs. If you are looking for a dairy-free option for this recipe you will need to make 2 small adjustments. Swap out butter for oil and the milk with coconut milk. These options still give the lemon poppyseed bread great flavor without sacrificing your dairy needs.

What is the Best Way to Store Lemon Poppy Seed Bread?

Lemon poppyseed bread is an easy-to-make and delicious treat. When you’ve baked this bread, the best way to store it is in an airtight container or wrapped in plastic wrap. To ensure its freshness, place the bread in a cool, dry area such as on the countertop, avoiding any direct sunlight. For longer storage, wrap the bread in plastic wrap and place it in the freezer. When it’s time to serve, thaw the bread overnight in the refrigerator, or for a few minutes in the microwave. Above all else, don’t forget to enjoy the bread within a few days of baking for the best flavor and texture.

Ingredients:

2 cups sugar

1 cup melted butter

3 eggs

1-1/2 teaspoons vanilla extract

1 teaspoon lemon zest

2 tablespoons poppy seeds

3 cups all purpose flour

1-1/2 teaspoons baking powder

1-1/2 teaspoons salt

1-1/2 cups milk

Icing:

2 tablespoons lemon juice

1/2 teaspoon lemon zest

3/4 cups powder sugar

Directions:

  1. Preheat oven to 350 degrees and grease 2 loaf pans

  2. Combine sugar, melted butter, eggs, vanilla and lemon zest.

  3. Stir in Poppy Seeds

  4. Mix in Flour, Baking Powder and Salt until well combined.

  5. Scrape down sides and add in Milk until mixed thoroughly.

  6. Divide batter evenly between prepared pans and bake for 45 min.

  7. Cool loaves for 10 min and prepare icing.

  8. Blend all icing ingredients and pour over warm loaves!

  9. ENJOY!

Tantalizingly Delicious Recipe For Lemon Cheesecake With An Amazing Glaze

If you love a dessert that is both tart and sweet, then you must try this tantalizingly delicious lemon cheesecake with an amazing glaze. Not only is this a crowd-pleaser, but it is also fairly easy to make. The sweet lemon cheesecake is perfectly balanced with a tangy tart glaze, making it the perfect end to any meal. This recipe is sure to please everyone at your next gathering. Not only is it incredibly delicious, but it's beautiful presentation will surely impress your guests. This rich and creamy confection offers a perfect balance of sweetness and citrus. The smooth and velvety texture is light and airy, yet dense enough to satisfy. The golden-brown crust is a delicious base for the perfectly balanced flavor of sweet and tart lemon, and to top it all off, a decadent and delectable topping of fresh lemon curd makes this amazing. Read on to learn how to make this delicious lemon cheesecake!

The perfect base of this sweet treat is a graham cracker crust that is incredibly easy to make with butter, graham crackers and pecans. This gives a great base for your cheesecake with a buttery and nutty crunch that is so scrumptious. This buttery crust will be a staple recipe to use on any cheesecake, I promise you that!

With its creamy and sweet lemon cheesecake filling made with fresh lemon juice, it has a rich and velvety smooth texture that melts in your mouth. The sweet light flavor is enhanced with a hint of vanilla and an aromatic citrus aroma that tantalizes your taste buds. This perfectly balanced flavor will make your mouth water and its light and airy texture will leave you craving for more. The amazing glaze adds the perfect finishing touch to this delightful dessert and adds an element of surprise from your traditional cheesecakes.

Making the glaze is also very simple and requires minimal ingredients. Once the glaze is finished, you can serve it on top of the cheesecake, or on the side so guests can add it themselves. The glaze gives the cheesecake an extra bit of texture and flavor that will make it truly irresistible. With a combination of eggs, sugar, butter, fresh lemon zest, and juice, the glaze adds a layer of sweetness to the creamy cheesecake that complements it perfectly. You can top the cheesecake and glaze with fresh berries, additional lemon zest or thinly sliced lemons like I have done here.

INGREDIENTS

Crust:

12 oz graham crackers

1 cup pecans

1 cup melted butter

Filling:

3 - 8 oz cream cheese ( room temperature )

1 stick salted butter

1/2 cup brown sugar

1/2 cup granulated sugar

1/4 teaspoons sea salt

3 eggs

1/2 cup heavy cream

1 tsp vanilla extract

3 tablespoons lemon zest

Glaze -

1 cup granulated sugar

2 eggs

1/4 cup fresh lemon juice

3 tablespoons lemon zest

6 tablespoons butter

INSTRUCTIONS

  1. Preheat oven to 375. Spray cheesecake pan with olive oil spray and wrap around the outside with foil.

  2. Make Crust by adding pecans & graham cracker to blender and processing until fine. Add in melted butter and blend again.

  3. Press crust mixture into bottom of pan until even all the way around. I use a flat bottom cup or a metal spoon to help.

  4. Bake in oven for 13-15 minutes. Once done remove and let cool before adding filling.

  5. Reduce oven temperature to 325 degrees.

  6. Make filling. Mix together softened cream cheese and butter with both sugars and salt until well combined.

  7. Add in eggs. One at a time. Making sure they are fully incorporated each time.

  8. Next add heavy cream, vanilla and lemon zest! Once well mixed add into cooled cheesecake pan.

  9. You will then add this onto a tray with a lip. I use this one -here-. (Code Amanda20 for 20% off any order at 360cookware.com) Place on oven rack and add in warm water until halfway full and push back rack and start timer.

  10. Cook the cheesecake for 1 hour. The center will still be a little jiggly, but side will be set. After baked for 1 hour you will turn oven off the oven and leave the cheesecake in the oven for an additional hour.

  11. Once baked for an hour and let sit for an hour in the oven, you can remove from the oven. Wrap cheesecake and let sit in your refrigerator overnight. Up to 24 hours before serving or adding glaze.

GLAZE INSTRUCTIONS

After Cheesecake has cooled overnight you will want to get the glaze ready for the finishing touch! You can add this onto each piece as you serve as you go just in case someone doesn’t want it, but I always add ahead of time, because it's so good everyone will!!

  1. Take a small saucepan over low/medium heat and whisk eggs, sugar, lemon peel & lemon juice.

  2. Add butter and continue whisking constantly. Mix until thickened. (It will stick the back of a wooden spoon)

  3. Remove from pan into a glass bowl and let cool for 15 min.

  4. Place in refrigerator until completely cooled. Then place on top of cheesecake and serve!

For those of us who are looking for a way to get creative in the kitchen, this recipe is the perfect choice. You can make this recipe your own by adding different flavors and ingredients. Plus, you can even top it off with a unique glaze. For those wanting a sweeter crust try adding in honey. Switch out the lemon zest and juice in the glaze for fresh berries and make a blueberry drizzle that is also amazing on a lemon cheesecake! For those wanting a keto option, change the graham cracker to additional nuts, either more pecans or almonds will do great. No matter what you do to make this your own this tantalizingly delicious: lemon cheesecake with amazing glaze is sure to be a hit!

If you’re looking for more delicious recipes like this one, make sure to follow me on Pinterest. I have lots of incredible delicious desserts that are perfect for any occasion. From cakes and pies to cookies and bars, you’ll find something that’s sure to be tantalizing your taste buds.

Here are a few others I think you will enjoy:

Indulge in Deliciousness: Cherry Chip Cake with Chunks of Dark Chocolate Recipe

Chocolate Peanut Butter Brownies

Brown Butter Caramel Pretzel Cookies

Delicious & Easy Apple Pie

Refreshing Lemon Twist Cocktail

If you’re looking for a refreshing cocktail and the perfect drink to sip on all those hot Summer days.. look no further! This is my take on the lemon cocktails I was enjoying all over Broadway St. on our Nashville trip! It’s super easy to make for a group by starting with mixing the first 3 ingredients and then topping with your favorite sparkling wine or champagne! This will forever me by goto! Can’t wait to see what you all think! Cheer’s Friends!

2 oz lemon juice

2 oz limoncello

2 oz ginger beer

champagne

  1. Grab your favorite glasses and fill with ice

  2. Pour in fresh squeezed lemon juice, limoncello, ginger beer and stir with spoon.

  3. Pour over champagne to fill glass.

  4. Top with lemon slices and Enjoy!